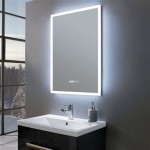
DIY Vanity Mirror with LED Lights
A well-lit vanity mirror is essential for makeup application, skincare routines, and even everyday grooming. While purchasing a ready-made LED vanity mirror can be convenient, building one offers the flexibility to customize the size, style, and lighting to perfectly match individual needs and aesthetic preferences. This article provides a comprehensive guide to constructing a personalized LED vanity mirror.
Essential Materials
Gathering the necessary materials beforehand streamlines the construction process. This list encompasses the core components for a basic DIY LED vanity mirror:
- Mirror (size and shape depending on preference)
- LED Strip Lights (choose desired color temperature and brightness)
- Power Supply for LED lights (compatible with chosen LED strip)
- Wiring and Connectors (for connecting the LED strip to the power supply)
- Frame or Mounting Board (wood, metal, or plastic)
- Measuring Tape and Pencil
- Drill and Screws (for mounting the mirror and frame components)
- Safety Glasses
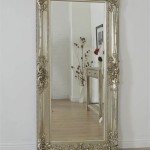
Choosing the Right Mirror
The mirror serves as the centerpiece of the project. Careful consideration should be given to its size, shape, and type. Standard rectangular or square shapes are common, but circular and oval mirrors can add a unique touch. The dimensions should be chosen based on the available space and desired usage.
- Consider the available space where the mirror will be installed.
- Choose a shape that complements the overall aesthetic of the room.
- Opt for a high-quality mirror with a clear reflection.
Selecting LED Strip Lights
LED strip lights offer flexibility and even illumination, making them ideal for vanity mirrors. Key factors in selecting LED strips include color temperature, brightness, and length. Color temperature is measured in Kelvin (K) and ranges from warm white (around 2700K) to cool white (around 6500K). Brightness is measured in lumens. The strip length should be sufficient to encompass the perimeter of the mirror.
- Warm white (2700K-3000K) provides a soft, inviting glow.
- Neutral white (4000K-4500K) offers balanced illumination.
- Cool white (6000K-6500K) provides bright, crisp light similar to daylight.
- Choose a brightness level that suits individual needs.
- Measure the mirror perimeter accurately to determine the required LED strip length.
Powering the LEDs
A compatible power supply is crucial for the safe and efficient operation of the LED strip lights. The power supply should match the voltage and amperage requirements of the chosen LED strip. Consult the LED strip manufacturer's specifications to determine the correct power supply.
- Match the voltage of the power supply to the LED strip requirements.
- Ensure the power supply provides sufficient amperage for the LED strip length.
- Consider a power supply with a switch for easy on/off control.
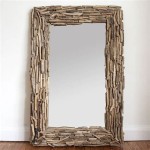
Assembling the Frame
The frame provides structural support for the mirror and houses the LED strips. Wood, metal, or plastic can be used depending on the desired aesthetic. The frame should be slightly larger than the mirror to allow for the placement of the LED strips.
- Cut the frame material to the appropriate dimensions.
- Assemble the frame using screws or adhesive, ensuring a secure structure.
- Sand and finish the frame as desired.
Mounting the Mirror and LED Strips
Securely mounting the mirror within the frame is essential. Adhesive or mounting clips can be utilized. The LED strips should be adhered to the inner edge of the frame, facing towards the mirror, ensuring even light distribution. Connect the LED strips to the power supply following the manufacturer’s instructions.
- Secure the mirror to the frame using appropriate adhesive or mounting clips.
- Adhere the LED strips to the inner edge of the frame, facing the mirror.
- Connect the LED strips to the power supply, observing correct polarity.
Wiring and Safety
Proper wiring and safety precautions are paramount throughout the process. Ensure all connections are secure and insulated to prevent electrical hazards. Consult local electrical codes and regulations if needed.
- Use appropriate wiring and connectors for the LED strip and power supply.
- Insulate all exposed wiring to prevent shorts and electrical hazards.
- Test all connections before finalizing the assembly.
Customization and Finishing Touches
Once the core components are assembled, personalization options can enhance the functionality and aesthetic appeal of the vanity mirror. A dimmer switch can provide adjustable brightness levels. Decorative elements, such as a frame border or painted design, can further customize the mirror.
- Consider adding a dimmer switch for adjustable brightness control.
- Incorporate decorative elements to enhance the mirror's appearance.
- Ensure all components are securely fastened for long-term use.

10 Diy Vanity Mirror Projects That Show You In A Diffe Light
:max_bytes(150000):strip_icc()/makesandmunchies-c136f898cca640faa72b6209012230cb.jpg?strip=all "7 Diy Lighted Mirror Ideas To Add A Little Extra Shine Your Space")
7 Diy Lighted Mirror Ideas To Add A Little Extra Shine Your Space

Diy Light Up Vanity Mirrors You Can Make Ohmeohmy Blog

Diy Light Up Vanity Mirror For 20 With Remote Lights

10 Diy Vanity Mirror Projects That Show You In A Diffe Light

How To Diy Vanity Mirror With Led Strip Lights

Diy Light Up Vanity Mirrors You Can Make Ohmeohmy Blog

Es Diy 84 In W X 32 H Rectangular Frameless Led Light Anti Fog Wall Bathroom Vanity Mirror Rgb Backlit Front Lighted Cjfxbm8432rgb The Home Depot

Modern Wood And Led Vanity Mirror Diy With Lights Makeup

Diy Vanity Mirror With Lights Under 150