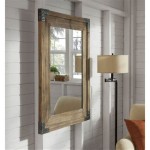
How to Hang a Frameless Mirror on Drywall
Hanging a frameless mirror on drywall presents unique challenges compared to framed mirrors. The absence of a frame removes the usual mounting points and requires specialized hardware and careful planning for a secure and aesthetically pleasing installation. This guide provides a step-by-step process for successfully hanging a frameless mirror, ensuring both safety and stability.
Planning and Preparation
Proper planning is essential for a successful installation. This involves carefully considering the mirror's weight, size, and desired location. Measurements should be precise to avoid misalignment and ensure the mirror hangs level.
- Measure the mirror's dimensions accurately.
- Determine the desired location and mark it on the wall.
- Check for studs using a stud finder. While not mandatory, mounting on studs provides added security, especially for heavier mirrors.
- Ensure the wall surface is clean and dry.
- Gather necessary tools and materials including a level, measuring tape, pencil, drill (if mounting on studs), appropriate fasteners, and mirror adhesive.
Choosing the Right Mounting Method
Several methods exist for mounting frameless mirrors, each suited to different mirror sizes and weights. Selecting the appropriate method ensures a secure and long-lasting installation.
- J-Channels: Ideal for smaller, lighter mirrors. J-channels are metal or plastic tracks mounted to the wall, into which the mirror slides.
- Mirror Clips: Suitable for small to medium-sized mirrors. Clips grip the edges of the mirror and are secured to the wall with screws or adhesive.
- Mirror Mastic: A strong adhesive specifically designed for mirrors. It provides a secure hold for larger and heavier mirrors and is often used in conjunction with other mounting methods for added stability.
- Z-Clips: Offer a more discreet mounting solution, often used for heavier mirrors. One part of the clip is attached to the wall, while the other is adhered to the back of the mirror, allowing the mirror to hang securely.
Installing J-Channels
J-channels offer a straightforward mounting solution for lighter mirrors. Their track-like design makes installation relatively simple.
- Cut the J-channels to the desired length, ensuring they are slightly shorter than the mirror's height or width, depending on the orientation.
- Position the channels on the wall according to the planned location and secure them with screws or appropriate adhesive.
- Carefully slide the mirror into the channels, ensuring it is seated correctly.
Installing Mirror Clips
Mirror clips provide a versatile mounting solution for a range of mirror sizes. They are available in different styles and sizes to accommodate varying weights.
- Determine the placement of the clips, ensuring even spacing around the mirror's perimeter.
- Mark the clip locations on the wall.
- Attach the clips to the wall using screws or adhesive.
- Carefully position the mirror onto the clips, ensuring a secure fit.
Using Mirror Mastic
Mirror mastic provides a strong bond for heavier mirrors. Proper application is critical for a successful installation.
- Apply the mastic to the back of the mirror in a continuous, S-shaped pattern or in evenly spaced dabs.
- Carefully position the mirror on the wall, applying even pressure.
- Use temporary supports, such as painter's tape or wooden blocks, to hold the mirror in place while the mastic cures.
- Follow the manufacturer's instructions for curing time.
Installing Z-Clips
Z-clips provide a hidden mounting solution for a clean, modern look. Their two-part design requires precise alignment for proper installation.
- Attach one part of the Z-clip to the wall, ensuring proper spacing and alignment.
- Adhere the corresponding part of the Z-clip to the back of the mirror, aligning it carefully with the wall-mounted clips.
- Carefully hang the mirror onto the wall-mounted clips, ensuring a secure connection.
Safety Precautions
Safety should always be a priority when handling and installing mirrors. Taking necessary precautions minimizes the risk of accidents and ensures a successful installation.
- Wear appropriate safety gear, including gloves and eye protection.
- Handle the mirror with care to avoid breakage.
- Use the proper tools and techniques for each mounting method.
- If working with a particularly large or heavy mirror, enlist the help of another person.
- Consult a professional if unsure about any aspect of the installation process.
Post-Installation Considerations
After the mirror is securely mounted, a few final steps ensure a finished and polished look. These steps also contribute to the longevity of the installation.
- Clean the mirror surface with a glass cleaner.
- Inspect the installation to ensure the mirror is secure and level.
- If necessary, apply sealant around the edges of the mirror to prevent moisture from getting behind it, which can damage the wall and the mirror backing.

How To Install A Mirror Without Frame Merrypad

How To Hang A Frameless Mirror On The Wall With Pictures

How To Hang A Frameless Mirror On The Wall With Pictures

How To Hang A Frameless Mirror On The Wall With Pictures

How To Hang A Frameless Mirror June 2024 Your Guide Hanging
:strip_icc()/ScreenShot2022-04-28at1.12.19PM-e055476c70c6438585fa7c5cd531edcf.png?strip=all "4 Easy Ways To Hang A Heavy Mirror")
4 Easy Ways To Hang A Heavy Mirror

How To Hang A Mirror With Clips

How To Hang A Frameless Mirror On Wall 3 Methods

How To Hang A Frameless Mirror On The Wall With Pictures

How To Hang A Frameless Mirror On The Wall With Pictures