Molding Around a Bathroom Mirror: Enhancing Aesthetics and Functionality
Bathroom mirrors, essential for daily routines, can be significantly enhanced with the addition of molding. Molding provides a decorative frame, creating a polished and finished look. Beyond aesthetics, it can also serve practical purposes, such as covering gaps between the mirror and wall, protecting the wall from moisture, and even visually enlarging the mirror's appearance.
A wide variety of molding materials are available, each offering unique characteristics and advantages. Popular choices include wood, PVC, polyurethane, and MDF. Wood molding provides a classic, natural look and can be stained or painted to match existing bathroom decor. However, wood is susceptible to moisture damage and may require regular maintenance. PVC, or polyvinyl chloride, is a highly durable and water-resistant option, making it ideal for the humid bathroom environment. It is also lightweight and easy to install. Polyurethane molding offers similar benefits to PVC, with the added advantage of being highly resistant to dents and scratches. MDF, or medium-density fiberboard, is a cost-effective choice that can be easily painted or finished to mimic the look of more expensive wood moldings.
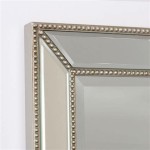
Selecting the appropriate molding style depends on the overall bathroom design and personal preferences. Simple, flat moldings offer a clean, minimalist look, while more ornate profiles can add a touch of elegance and sophistication. Consider the size and shape of the mirror when choosing a molding style. A large, ornate mirror may be complemented by a similarly ornate molding, while a smaller, simpler mirror may benefit from a more understated frame.
Before beginning the installation process, careful measurements are crucial. Accurately measuring the mirror's dimensions ensures the molding will fit precisely. It is also essential to consider the width of the chosen molding when taking measurements. Slightly overestimating the required length is advisable to allow for adjustments and miter cuts.
Proper surface preparation is essential for successful molding installation. The wall and mirror edges must be clean, dry, and free of dust or debris. Lightly sanding the wall surface can improve adhesion. If the wall has been recently painted, it is important to allow sufficient drying time before installing the molding.
Several adhesive options are available for securing the molding to the mirror and wall. Construction adhesive provides a strong bond and is suitable for most molding materials. Liquid nails are another popular choice, offering excellent adhesion and flexibility. For lighter moldings, double-sided tape can be a convenient and effective option. When using adhesives, it is important to follow the manufacturer's instructions for application and drying times.
Precise cutting of the molding is necessary for a professional-looking finish. Miter cuts, angled cuts made at the corners, create seamless joints. A miter saw or miter box and saw can be used to achieve accurate miter cuts. For curved mirrors or moldings, a coping saw may be required to create the necessary contours.
After the molding has been cut and fitted, it can be secured to the mirror and wall using the chosen adhesive. Apply a thin bead of adhesive to the back of the molding and press it firmly against the mirror and wall. Use painter's tape to hold the molding in place while the adhesive dries. Wipe away any excess adhesive with a damp cloth.
Once the adhesive has fully cured, the finishing touches can be applied. Caulk can be used to fill any gaps between the molding and the mirror or wall, creating a seamless and watertight seal. The caulk should be smoothed with a wet finger or caulk tool for a professional finish. After the caulk has dried, the molding can be painted or stained to match the desired aesthetic.
Maintaining bathroom mirror molding is relatively straightforward. Regular cleaning with a damp cloth and mild detergent can help prevent the buildup of grime and mildew. Avoid using abrasive cleaners, as these can scratch the molding surface. For wood moldings, periodic application of a wood sealant can help protect against moisture damage.
Adding molding around a bathroom mirror is a relatively simple and cost-effective way to elevate the overall appearance of the space. By carefully considering material choices, styles, and installation techniques, homeowners can achieve a professional-looking result that enhances both the aesthetics and functionality of their bathroom.

Easy Diy Tutorial Adding Trim Around A Giant Mirror For Ers

Bathroom Mirror Framed With Crown Molding Large Mirrors Frame Makeover

Diy Bathroom Mirror Frame With Molding The Happier Homemaker

Easy Diy Tutorial Adding Trim Around A Giant Mirror For Ers

Mirror Molding The Easy Upgrade To Boring Bathrooms Mirrorchic

How To Frame Out That Builder Basic Bathroom Mirror For 20 Or Less

How To Frame A Mirror Sand And Sisal

Mirror Frame Diy How To Update A Basic Bathroom Our Faux Farmhouse

How To Frame A Mirror

The Kids Bathroom Mirror Gets Framed House Of Hepworths

