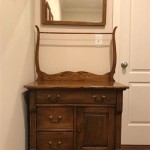
Broken Dresser Mirror Replacement
Replacing a broken dresser mirror can seem daunting, but with the right tools and a bit of patience, it's a manageable task. This article provides a comprehensive guide to replacing a broken dresser mirror, covering everything from assessing the damage and sourcing a replacement to installation and safety considerations.
Assessing the Damage and Determining the Replacement Strategy
The first step is to assess the extent of the damage. Is only the mirror broken, or is the frame damaged as well? If the frame is intact and in good condition, replacing only the mirror is the most straightforward option. However, if the frame is also damaged, replacing the entire unit might be more practical or aesthetically pleasing.
Careful measurements of the broken mirror are crucial. Measure the height and width precisely, noting these dimensions for future reference. For irregularly shaped mirrors, create a template using cardboard or heavy paper to ensure an accurate fit for the replacement.
Sourcing a Replacement Mirror
Several options exist for obtaining a replacement mirror. Local glass and mirror shops offer custom-cut mirrors based on provided dimensions. They can often provide advice on mirror thickness and type. Online retailers also offer a wide selection of mirrors, but careful packaging and shipping considerations are essential to prevent damage during transit. Repurposing a mirror from another piece of furniture is a sustainable option, provided it fits the dresser dimensions and aesthetic.
When selecting a replacement, consider the mirror's type. Standard mirrors are commonly used, but options like tempered glass offer increased safety due to their shatter-resistant properties. For antique or vintage dressers, seeking out antique mirrors or those with an aged finish may better preserve the piece's overall style.
Tools and Materials for Replacement
Gathering the necessary tools and materials beforehand streamlines the replacement process. Essential tools typically include a screwdriver, pliers, safety glasses, heavy-duty gloves, and a measuring tape. Depending on the mounting method, additional tools like a drill or glue may be required.
Materials for securing the replacement mirror can vary. Mirror adhesive, clips, or mounting brackets are common choices. Choosing the right materials depends on the dresser's construction and the desired method of attachment.
Removing the Broken Mirror and Preparing the Dresser
Prioritize safety when removing the broken mirror. Wear heavy-duty gloves and safety glasses to protect against shards of glass. Carefully remove any remaining pieces of the broken mirror, using pliers if necessary. Dispose of the broken glass properly, wrapping it in thick paper or cardboard and labeling it clearly.
Once the broken mirror is removed, clean the dresser surface where the new mirror will be installed. Remove any old adhesive or mounting hardware. A clean and smooth surface ensures proper adhesion and a secure fit for the replacement mirror.
Installing the New Mirror
The installation process depends on the chosen mounting method. If using mirror adhesive, apply it evenly to the back of the replacement mirror or the designated areas on the dresser. Follow the adhesive manufacturer's instructions for drying times. For clips or mounting brackets, ensure they are securely attached to the dresser before positioning the mirror.
Carefully position the new mirror within the frame or on the dresser. Apply gentle pressure to ensure proper adhesion or secure placement within the mounting hardware. Allow adequate drying or setting time before using the dresser.
Alternative Mounting Methods
While adhesive, clips, and brackets are common methods for securing a dresser mirror, alternative techniques can be employed. For heavier mirrors, using screws and backing boards provides additional support and stability. This method involves attaching a backing board to the dresser and then screwing the mirror to the board. For a more decorative approach, consider framing the mirror with molding or trim. This adds a decorative element and provides a secure mounting point.
Safety Precautions and Considerations
Throughout the entire process, prioritize safety. Always wear appropriate safety gear, including gloves and eye protection. Handle glass carefully and dispose of broken pieces responsibly. When working with adhesives, ensure proper ventilation. If unsure about any step of the process, consulting a professional glass installer or handyman is recommended.
Maintaining the Replaced Mirror
Regular cleaning with a suitable glass cleaner keeps the replaced mirror looking its best. Avoid using abrasive cleaners, which can scratch the mirror surface. Periodically check the mirror's mounting to ensure it remains secure and stable. Addressing any looseness promptly prevents potential damage or accidents.

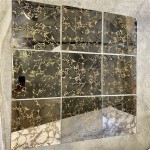
Why I Ll Never Buy A Piece Of Mirrored Furniture Again Whats Ur Home Story

Broken Mirror Replacement

Repair Fake Wood Dresser Mirror My Repurposed Life

Diy Mirrored Chest Repair Quick

Diy Mirrored Chest Repair Quick

Repair Fake Wood Dresser Mirror My Repurposed Life

Broken Wardrobe Mirror Replacement

Repair Fake Wood Dresser Mirror My Repurposed Life

10 Custom Cut Chalkboard Mirror Replacement Sea Bee Market

Repair Fake Wood Dresser Mirror My Repurposed Life