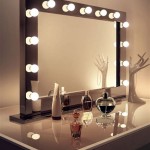
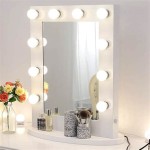
How Do You Make a Vanity Mirror with Lights?
Creating a custom vanity mirror with lights is a rewarding project that enhances any room's aesthetic. This detailed guide provides a step-by-step approach to building a personalized vanity mirror, encompassing material selection, assembly, and wiring.
Choosing the Right Mirror
The foundation of any vanity mirror is, of course, the mirror itself. Consider the desired size and shape carefully. Rectangular, square, oval, and round mirrors are common choices, with dimensions depending on the available space and personal preference. Frameless mirrors offer a sleek, modern look, while framed mirrors introduce decorative elements. The mirror's thickness also plays a role in its durability and weight. Opting for a thicker mirror provides greater stability but increases the overall weight of the finished product.
Selecting and Positioning Lights
The type and placement of lights significantly impact the functionality and visual appeal of a vanity mirror. Common options include LED strip lights, globe bulbs, and puck lights. LED strip lights offer flexibility and even illumination, making them a popular choice. Globe bulbs provide a classic, vintage aesthetic, while puck lights offer focused, directional lighting. When positioning lights, consider the mirror's shape and intended use. For even illumination across the face, lights should be spaced evenly around the perimeter of the mirror. For task lighting, lights can be focused on specific areas. Ensure the chosen lights are compatible with the planned wiring setup and power source.
Essential Materials and Tools
Gathering the necessary materials and tools before starting the project streamlines the building process. The essential materials include the chosen mirror, lights, wiring, a power supply, mounting hardware, and potentially a frame or backing material. Tools typically required include a measuring tape, drill, screwdriver, wire strippers, electrical tape, and a level. Safety equipment such as safety glasses and gloves are also recommended. Choosing high-quality materials ensures the longevity and safety of the finished vanity mirror.
Constructing the Frame or Backing
If using a frameless mirror, creating a backing provides a surface for mounting the lights and wiring. This backing can be made from plywood, MDF, or another suitable material. Cut the backing to the desired dimensions, ensuring it is slightly larger than the mirror itself to provide a mounting surface. If using a framed mirror, the frame itself can often serve as the mounting surface for the lights. Sand and finish the frame or backing as desired before proceeding with the lighting installation.
Wiring the Lights
Wiring the lights requires careful attention to safety and proper electrical practices. Before beginning any wiring, ensure the power supply is disconnected. Follow the manufacturer’s instructions for wiring the chosen lights, connecting them in series or parallel as appropriate. Use appropriately sized wiring and ensure all connections are secure and properly insulated with electrical tape. If working with LED strip lights, ensure the correct polarity is observed. Test the lighting setup before proceeding with final assembly to ensure all connections are functioning correctly.
Mounting the Lights and Mirror
Once the wiring is complete, mount the lights to the frame or backing. Securely attach the lights using appropriate hardware, ensuring they are evenly spaced and positioned for optimal illumination. Then, carefully attach the mirror to the frame or backing. Depending on the mirror and backing material, this can be accomplished using adhesive, clips, or other mounting hardware. Ensure the mirror is securely mounted to prevent movement or damage. After the mirror is mounted, double-check all wiring connections and ensure they are still secure and insulated.
Connecting the Power Supply and Final Touches
Connect the wiring to the power supply, ensuring the correct polarity is observed. Securely mount the power supply in a safe and accessible location, following all applicable electrical codes. Once the power supply is connected, test the vanity mirror to ensure all lights are functioning correctly. Add any finishing touches, such as a dimmer switch or decorative elements. Finally, securely mount the completed vanity mirror to the wall using appropriate hardware, ensuring it is level and stable.
Safety Precautions
Throughout the entire process, prioritize safety. Always disconnect the power supply before working with wiring. Use appropriate safety equipment, including safety glasses and gloves. Follow all manufacturer’s instructions for the lights and power supply. If uncertain about any aspect of the wiring or electrical connections, consult a qualified electrician. Ensuring proper grounding and following all applicable electrical codes are crucial for safety and preventing electrical hazards.

Diy Light Up Vanity Mirrors You Can Make Ohmeohmy Blog

Diy Light Up Vanity Mirrors You Can Make Ohmeohmy Blog

How To Make A Vanity Or Bathroom Mirror With Strip Lights

Diy Make Up Mirror Vanity Makeup

Diy Light Up Vanity Mirrors You Can Make Ohmeohmy Blog

How To Diy Vanity Mirror With Led Strip Lights

How To Diy Vanity Mirror With Led Strip Lights

20 Diy Vanity Mirror Using Led Lights And Easy

Diy Light Up Vanity Mirrors You Can Make Ohmeohmy Blog

How To Make A Vanity Or Bathroom Mirror With Strip Lights