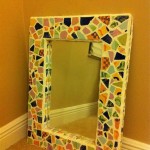
How To Decorate a Mirror with Mosaic Tiles
Decorating a mirror with mosaic tiles can transform an ordinary looking glass into a unique piece of art. This process involves adhering small tiles to the mirror's frame, creating intricate patterns and adding a touch of personalized style. This article provides a comprehensive guide on how to achieve this, outlining the necessary materials, preparation steps, and application techniques.
Materials Required: Several key materials are necessary for this project. These include a mirror with a frame suitable for tiling, mosaic tiles of varying colors and shapes, tile adhesive appropriate for glass and mirror surfaces, tile grout, grout sealant, safety glasses, gloves, a tile nipper or wheeled mosaic cutter, a sponge, and a bucket of clean water.
Choosing the Right Tiles: Mosaic tiles come in a wide range of materials, including glass, ceramic, porcelain, and natural stone. Choosing the appropriate tile depends on the desired aesthetic and environmental conditions. Glass tiles offer vibrant colors and light reflectivity, while ceramic and porcelain tiles provide durability. Natural stone tiles introduce an earthy, organic element. The size and shape of the tiles also play a crucial role in the final design. Smaller tiles allow for intricate details, while larger tiles provide a bolder, more streamlined look.
Preparing the Mirror and Frame: Before beginning the tiling process, the mirror and frame should be thoroughly cleaned. This ensures optimal adhesion of the tiles. Use a glass cleaner to remove any dust, dirt, or fingerprints from the mirror surface. The frame should be cleaned with a suitable cleaner depending on its material. A damp cloth is usually sufficient for wooden frames, while metal frames may require a specialized cleaning solution. Ensure the frame is completely dry before proceeding.
Planning the Design: Planning the mosaic design beforehand is crucial. Sketching the pattern on paper can help visualize the final product and ensure efficient tile placement. Consider the overall aesthetic of the room where the mirror will be displayed. Factors such as color schemes, existing decor, and the desired style should influence the design choices. This pre-planning stage helps avoid mistakes and ensures a cohesive final product.
Applying the Tiles: The tile adhesive should be applied to the mirror frame in small sections, following the manufacturer's instructions. Using a notched trowel creates evenly spaced ridges in the adhesive, ensuring proper tile adhesion. Start placing the tiles onto the adhesive, pressing firmly to ensure a strong bond. Maintain consistent spacing between tiles, leaving enough room for the grout. Refer to the pre-planned design to guide tile placement. Adjustments can be made as needed during this stage.
Cutting Tiles: For intricate designs or areas where whole tiles don't fit, cutting tiles may be necessary. A tile nipper is suitable for smaller tiles, while a wheeled mosaic cutter offers greater precision for larger or thicker tiles. Safety glasses should always be worn when cutting tiles to protect the eyes from flying fragments.
Grouting the Tiles: Once the adhesive has fully cured, typically after 24 hours, the grouting process can begin. Mix the grout according to the manufacturer's instructions. Using a rubber grout float, apply the grout to the spaces between the tiles, ensuring complete coverage. Work the grout into the gaps at a 45-degree angle to minimize air pockets. Remove excess grout with the edge of the float.
Cleaning the Tiles: After allowing the grout to set for the recommended time, typically 15-30 minutes, clean the tiles with a damp sponge. This removes any residual grout haze and reveals the vibrant colors of the mosaic. Rinse the sponge frequently in clean water, ensuring not to over-wet the grout lines. Excessive moisture can weaken the grout.
Sealing the Grout: Once the grout is completely dry, usually after 24-48 hours, apply a grout sealant. This protects the grout from staining and moisture damage, extending its lifespan. Apply the sealant according to the manufacturer's instructions, ensuring complete coverage of all grout lines. Allow the sealant to dry completely before hanging the mirror.
Finishing Touches and Considerations: After the sealant has dried, inspect the finished product for any imperfections. Small gaps or missing grout can be easily repaired. Allow ample drying time for all materials before hanging the mirror. Consider the weight of the finished piece and use appropriate hanging hardware to ensure secure mounting.

Diy Mosaic Tile Bathroom Mirror Centsational Style

Diy Mosaic Tile Bathroom Mirror Centsational Style

Pin On Projects For Home

How To Decorate A Mirror With Tile Sand And Sisal

40 Diy Mosaic Design Ideas With Tile Rocks And Glass Mirror Frame Vase

How To Decorate A Mirror With Tile Sand And Sisal

Creative Mirror Decorating Ideas Be Wall Stickers Alternative To Bathroom Tiles Decor

Pin By Debra Woods On Mosaic Mirror Stained

How To Decorate A Mirror With Tile Sand And Sisal

Wall Mirror Decorative Bathroom Decor Blue Mosaic Artesanato Em Mosaico Espelhos De Arte