Adding a Frame to an Oval Bathroom Mirror
Oval bathroom mirrors offer a classic, elegant touch to any bathroom. While many come pre-framed, adding a frame to an unframed oval mirror can significantly enhance its aesthetic appeal and tie it into the overall bathroom design. This article will explore various methods and materials for framing an oval bathroom mirror, providing a comprehensive guide for homeowners seeking to elevate their bathroom décor.
Before embarking on the framing project, accurate measurements are crucial. Carefully measure the length and width of the oval mirror. These measurements will determine the dimensions of the frame materials. Adding a small margin to these measurements, typically around ¼ to ½ inch, allows for slight variations and ensures the frame adequately covers the mirror's edges.
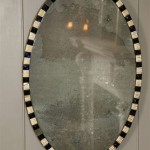
Several framing material options exist, each offering distinct aesthetic qualities and installation challenges. Wood provides a warm, traditional look and can be stained or painted to match the bathroom's color scheme. Various wood types, from simple pine to more ornate mahogany, offer diverse design possibilities. Metal frames provide a sleek, modern look, with options ranging from polished chrome to brushed nickel or antique brass. Mosaic tiles offer a unique and customizable approach, allowing for creative patterns and color combinations. Finally, repurposed materials, such as driftwood or old picture frames, can create an eclectic and personalized touch.
The chosen framing material influences the installation method. Wood frames are typically built around the mirror, using miter cuts to create precise angled joints. Adhesive and small finishing nails secure the frame pieces together. Metal frames can be purchased pre-fabricated and simply affixed to the mirror using adhesive or clips. Mosaic tiles require a substrate, such as a thin piece of plywood cut to the mirror's dimensions, onto which the tiles are adhered. The tiled substrate is then attached to the mirror. Repurposed materials necessitate creative installation techniques, often involving adhesive, wire, or other fastening methods, depending on the material's properties.
When working with wood, precise miter cuts are essential for a professional finish. A miter saw or miter box ensures clean, accurate angles. Wood glue provides the primary bonding agent, while finishing nails offer additional reinforcement and prevent separation. Wood filler can be used to conceal nail holes and any gaps between frame pieces, creating a seamless appearance. Once the frame is assembled and attached to the mirror, sanding and finishing are crucial steps. Sanding smooths any rough edges and prepares the surface for staining or painting. A sealant or varnish protects the wood from moisture and enhances its longevity in the bathroom environment.
Metal frames often involve simpler installation. Pre-fabricated metal frames designed specifically for mirrors typically include adhesive backing or clips for attachment. Ensuring the mirror surface is clean and dry before applying adhesive is essential for a strong bond. Clips offer a more adjustable option, allowing for minor adjustments during installation. However, clips may be visible, depending on the frame design.
Creating a mosaic frame requires more intricate work. Adhering the individual tiles to the substrate using tile adhesive requires patience and precision. Grouting the spaces between the tiles completes the mosaic and provides a water-resistant seal. Selecting the right type of grout is essential for bathroom applications, as it must withstand moisture and humidity. Epoxy grout is often recommended for its superior moisture resistance and durability.
Repurposed materials demand adaptable installation strategies. Adhesive remains a common method for attaching lightweight materials like shells or small pieces of driftwood. Wire or other fastening mechanisms may be necessary for heavier materials or more complex designs. Safety is paramount when working with repurposed materials, particularly if they involve sharp edges or require cutting or modification. Appropriate safety equipment, such as gloves and eye protection, should always be used.
Regardless of the chosen framing material, meticulous preparation is key to a successful outcome. Cleaning the mirror surface thoroughly with glass cleaner removes any dust or residue that could interfere with adhesion. Laying down protective covering on the bathroom vanity or floor prevents damage from adhesive spills or dropped tools. Having all necessary tools and materials readily available streamlines the process and minimizes interruptions.
Framing an oval bathroom mirror allows for personalized design and enhanced aesthetic appeal. Choosing the appropriate framing material and installation method depends on individual preferences, budget, and DIY skill level. Careful planning, precise measurements, and meticulous execution ensure a professional-looking result that elevates the bathroom's overall design.

Rattan Frame For Oval Mirror Checking In With Chelsea

Rattan Frame For Oval Mirror Checking In With Chelsea

I Need An Idea To Frame My Oval Shaped Bathroom Mirrors Hometalk

Diy Bathroom Mirror Frame Ideas Arinsolangeathome

36 In W X 18 H Vertical Horizontal Hang Oval Gold Steel Framed Wall Mounted Bathroom Vanity Mirror Zt D0102h7v7ij The Home Depot

I Need An Idea To Frame My Oval Shaped Bathroom Mirrors Hometalk

Metal Frame Pivot Oval Wall Mirror 26 West Elm

I Need An Idea To Frame My Oval Shaped Bathroom Mirrors Hometalk

Dropship Wall Mounted Mirror 36 X18 Oval Bathroom Gold Vanity W Stainless Steel Metal Frame Pre Set Hooks For Vertical Horizontal Hang Ideal Bedroom To

Andy Star Modern 22 X 30 Inch Oval Wall Hanging Bathroom Vanity Mirror Gold 1 Piece Kroger

