Adding Molding Around a Bathroom Mirror: A Guide to Enhancing Your Space
Mirrors are essential elements in any bathroom, serving both functional and aesthetic purposes. They provide a sense of spaciousness, amplify natural light, and enhance the overall design of the room. However, a simple mirror can sometimes feel bland or incomplete. Adding molding around a bathroom mirror can transform its appearance, adding sophistication and a touch of elegance to your bathroom décor.
Molding, also known as trim, is a decorative strip of material used to frame or embellish areas in a room. It comes in various materials, such as wood, plastic, and metal, and offers a wide range of styles, from simple to ornate. Adding molding to a mirror can create a focal point, enhance its visual impact, and complement the overall design of your bathroom. This article explores the benefits of adding molding around a bathroom mirror and provides a step-by-step guide to achieving a polished and elegant look.
Enhance the Visual Appeal of Your Bathroom
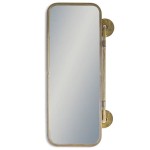
Adding molding around a bathroom mirror can significantly enhance its visual appeal. The framing effect creates a sense of definition and draws attention to the mirror, making it a prominent design element in your bathroom. Molding can be used to create a classic, modern, or rustic look, depending on the style of your bathroom and personal preferences.
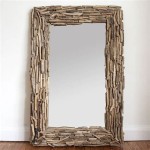
For a classic look, consider using traditional wood molding with intricate details or a simple, understated design. For a modern look, opt for clean-lined molding with a minimalist aesthetic. If your bathroom has a rustic charm, you can choose reclaimed wood molding with natural imperfections or distressed finishes.
Add Depth and Dimension to the Mirror
Molding adds depth and dimension to the mirror, making it appear more substantial and visually interesting. The framing effect creates a sense of separation between the mirror and the wall, making it appear as though it is floating or recessed. This effect is particularly beneficial in smaller bathrooms, where adding depth can make the space feel larger.
Choosing a molding with contrasting colors or textures can further enhance the depth and dimension of the mirror. For example, using a dark-colored molding around a light-colored mirror can create a dramatic effect, while using a textured molding against a smooth mirror surface can add visual interest and dimension.
Create a Focal Point in Your Bathroom
Adding molding around a bathroom mirror can instantly create a focal point in your bathroom, drawing attention to the mirror and enhancing its presence in the room. The framing effect draws the eye to the mirror, making it a key feature in your bathroom décor.
You can further enhance the focal point effect by choosing unique molding styles or adding decorative elements, such as decorative brackets or ornate trims. For example, adding decorative brackets to the corners of the molding can create a sophisticated and elegant look, while ornate trims can add a touch of grandeur to the mirror.
Steps to Add Molding Around a Bathroom Mirror
Adding molding around a bathroom mirror is a relatively simple DIY project that requires minimal tools and materials. Here's a step-by-step guide to get you started:
- Prepare the area: Before you begin, clean the surface of the mirror and the surrounding walls. Remove any dust, dirt, or debris that could interfere with the adhesion of the molding. You can use a damp cloth or a vacuum cleaner to clean the area.
- Measure and cut the molding: Measure the perimeter of the mirror and mark your measurements on the molding. Use a miter saw or a handsaw to cut the molding to the desired lengths. Make sure to make accurate cuts, as even small errors can be visually distracting.
- Position and attach the molding: Once the molding is cut to the correct lengths, apply a bead of construction adhesive to the back of the molding. Position the molding around the mirror and press it firmly into place. Use a level to ensure that the molding is straight and even. Allow the adhesive to dry completely before proceeding to the next step.
- Finish the molding: After the adhesive has dried, you can finish the molding to your desired look. You can paint the molding to match the color of your walls, use a contrasting color to create a bold statement, or leave it unpainted for a natural wood finish.
- Optional: If you wish to further enhance the appearance of your bathroom mirror, you can add decorative elements, such as decorative brackets or ornate trims.
By following these simple steps, you can easily add molding around your bathroom mirror and create a stunning focal point in your bathroom. Remember, the key to a successful project is to choose molding that complements the style of your bathroom and to take your time with the installation to ensure a professional finish.

Easy Diy Tutorial Adding Trim Around A Giant Mirror For Ers

How To Frame Out That Builder Basic Bathroom Mirror For 20 Or Less

Diy Bathroom Mirror Frame With Molding The Happier Homemaker

Easy Diy Tutorial Adding Trim Around A Giant Mirror For Ers

The Kids Bathroom Mirror Gets Framed House Of Hepworths

Easy Diy Tutorial Adding Trim Around A Giant Mirror For Ers

Mirror Frame Diy How To Update A Basic Bathroom Our Faux Farmhouse

How To Frame A Bathroom Mirror

How To Frame A Mirror

How To Frame A Mirror Sand And Sisal