Adding a Frame to a Frameless Mirror
Frameless mirrors offer a sleek, modern aesthetic, but sometimes a touch of traditional elegance or a pop of color is desired. Fortunately, adding a frame to a frameless mirror is a relatively straightforward project that can dramatically enhance its visual appeal and integrate it seamlessly into any décor. This article explores the various methods and considerations for framing a frameless mirror.
Choosing the Right Frame
The first step in framing a frameless mirror involves selecting an appropriate frame. Several factors influence this decision, including the mirror's size, shape, existing décor, and desired aesthetic. A large, ornate frame might overwhelm a small mirror, while a thin, minimalist frame could get lost on a large one. Consider the mirror's location as well. A bathroom mirror might benefit from a moisture-resistant frame material, while a living room mirror offers more flexibility.
Frame materials range from natural wood and metal to synthetic options like polystyrene and polyurethane. Each material offers distinct advantages and disadvantages. Wood provides a classic, warm look but requires more maintenance. Metal frames offer durability and a modern feel. Synthetics are often more affordable and come in a wider variety of styles but may lack the authenticity of natural materials. The frame's width and profile should also complement the mirror's size and style.
Finally, the frame's finish plays a crucial role in the overall aesthetic. Finishes can range from natural wood stains and painted colors to metallic finishes like brushed nickel or antique gold. The chosen finish should harmonize with the surrounding décor and the mirror's placement.
Methods for Attaching the Frame
Once the ideal frame has been selected, the next step is to attach it to the mirror. Several methods are commonly used, each with its own set of benefits and drawbacks.
**Adhesive:** Construction adhesive or specialized mirror adhesive offers a straightforward approach for attaching a frame. This method is particularly suitable for lighter frames and eliminates the need for visible fasteners. However, it's crucial to ensure the adhesive is compatible with both the frame material and the mirror's backing. Proper surface preparation, including cleaning and potentially sanding, is essential for optimal adhesion. It's also important to carefully align the frame before applying the adhesive, as adjustments can be difficult once the adhesive sets.
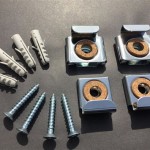
**Clips and Brackets:** J-clips, Z-clips, and other mounting brackets provide a more secure attachment method, particularly for heavier frames. These clips are typically attached to the back of the frame and then grip the edges of the mirror. This method allows for some adjustability during installation and can be preferable for larger or more valuable mirrors. However, it's important to select clips that are appropriately sized for both the frame and mirror thickness.
**Wood Frame Construction:** For those with woodworking experience, building a frame directly around the mirror offers maximum customization. This method involves constructing a frame from wood and then securing the mirror within the frame using backing boards and adhesive or clips. While more time-consuming, this approach allows for precise control over the frame's dimensions, profile, and finish.
Preparing the Mirror and Frame
Regardless of the chosen attachment method, proper preparation of both the mirror and frame is crucial for a successful outcome. The mirror surface should be thoroughly cleaned with a glass cleaner to remove any dust, fingerprints, or residue that could interfere with adhesion. If using an adhesive method, lightly sanding the frame's contact surface can improve adhesion.
Accurate measurements are essential for ensuring a proper fit. Carefully measure the mirror's dimensions and use these measurements to determine the required frame size. If using pre-made frames, ensure the frame's opening is slightly smaller than the mirror's dimensions to allow for a snug fit. When building a frame, precise cutting and assembly are vital for a professional-looking result.
Protecting the mirror during the framing process is also important. Laying down a soft cloth or protective covering can prevent scratches or chips. When using adhesive, masking tape can be applied to the mirror's edges to prevent excess adhesive from marring the surface. Working in a clean, well-lit area can also minimize the risk of damage.
Finally, after the frame is attached, allow adequate drying or curing time for the adhesive or fasteners before handling or hanging the framed mirror. Following the manufacturer's instructions regarding drying times is crucial for ensuring a secure and lasting bond.

How To Frame Out That Builder Basic Bathroom Mirror For 20 Or Less

Framing A Mirror With Upcycled Materials How To Frame Frameless Easy

How To Frame Out That Builder Basic Bathroom Mirror For 20 Or Less

Diy Custom Modern Bathroom Mirror Frame On A Budget

Diy Bathroom Mirror Frame Without Removing Clips Her Happy Home

Diy Stick On Mirror Frame Sawdust Sisters

How To Add A Frame Your Big Builder Mirror Easy Diy

The Kids Bathroom Mirror Gets Framed House Of Hepworths

Easy Diy Tutorial Adding Trim Around A Giant Mirror For Ers

Diy Stick On Mirror Frame Sawdust Sisters