Allen + Roth Mirror Installation Instructions
This document provides comprehensive instructions for installing Allen + Roth mirrors. Proper installation ensures the mirror's longevity and safety. Please read all instructions carefully before beginning the installation process.
Essential Tools and Materials
Gathering the necessary tools and materials beforehand streamlines the installation process. Having everything readily available prevents interruptions and ensures a smooth workflow.
- Measuring Tape
- Pencil
- Level
- Drill with appropriate drill bit (check mirror specifications)
- Screwdriver
- Wall Anchors (if necessary)
- Screws (provided with the mirror or specified in instructions)
- Safety Glasses
- Gloves
Preparing the Wall Surface
Proper wall preparation is crucial for a secure and stable mirror installation. The wall must be clean, dry, and capable of supporting the mirror's weight.
- Clean the wall surface with a mild detergent and water, then dry thoroughly.
- Inspect the wall for any imperfections or damage. Repair any cracks or holes before proceeding.
- Determine the wall type (drywall, concrete, etc.) to select the appropriate anchors and screws.
Locating and Marking the Mirror Position
Accurate measurement and marking ensure the mirror is positioned correctly and level. Careful planning at this stage prevents costly mistakes later.
- Decide on the desired mirror location.
- Use a measuring tape and pencil to mark the center point of the desired location.
- Use a level to draw a horizontal line across the wall at the desired height for the top or bottom edge of the mirror (depending on the mounting method).
- Refer to the mirror's specific instructions for recommended mounting height and clearances.
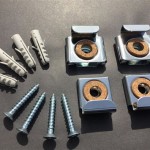
Installing the Mounting Hardware
The mounting hardware secures the mirror to the wall. Follow the manufacturer's instructions carefully for specific hardware placement and installation.
- Identify the designated mounting points on the back of the mirror.
- Measure and mark the corresponding locations on the wall, using the previously drawn horizontal line as a reference.
- If necessary, use a drill with the appropriate drill bit to create pilot holes for the screws.
- If using wall anchors, insert them into the pilot holes.
- Attach the mounting hardware to the wall using the provided screws.
Hanging the Mirror
Carefully hang the mirror on the installed mounting hardware. Ensure the mirror is securely seated and stable before releasing it.
- Carefully lift the mirror and align the mounting points on the back of the mirror with the corresponding hardware on the wall.
- Gently lower the mirror onto the mounting hardware, ensuring it is securely engaged.
- Check the stability of the mirror by gently applying pressure to different areas.
Mirror Maintenance and Care
Proper maintenance preserves the mirror's appearance and extends its lifespan. Regular cleaning and careful handling prevent damage and maintain its reflective qualities.
- Clean the mirror surface with a glass cleaner and a soft, lint-free cloth.
- Avoid using abrasive cleaners or harsh chemicals.
- Do not spray cleaner directly onto the mirror surface. Spray onto the cloth and then wipe the mirror.
- Handle the mirror with care to prevent chipping or cracking.
Troubleshooting
This section addresses common issues that may arise during installation and provides solutions.
- Mirror is not level: Double-check measurements and ensure the mounting hardware is installed evenly. Re-adjust as necessary.
- Mirror is wobbly: Ensure the mirror is properly seated on the mounting hardware and that the hardware is securely attached to the wall. Consider using stronger anchors if necessary.
- Difficulty aligning mounting points: Ensure the marked locations on the wall accurately correspond to the mounting points on the back of the mirror. Re-measure and adjust as needed.
Safety Precautions
Safety should always be the top priority during any installation project. Adhering to safety guidelines prevents accidents and ensures a safe working environment.
- Always wear safety glasses when drilling or working with power tools.
- Wear gloves to protect hands from sharp edges and materials.
- If working at heights, use a stable stepladder or scaffolding.
- If unsure about any aspect of the installation, consult a qualified professional.
These instructions provide general guidance for installing Allen + Roth mirrors. Always consult the specific instructions included with your particular mirror model for detailed information and any variations in the installation process. Following these guidelines will ensure a successful and safe installation.

Allen Roth 1789mr 22 201 In W X 30 H Slate Blue Rectangular Framed Bathroom Vanity Mirror Instruction Manual

Allen Roth 1789mr 22 201 In W X 30 H Slate Blue Rectangular Framed Bathroom Vanity Mirror Instruction Manual

Allen Roth 1789mr 22 201 In W X 30 H Slate Blue Rectangular Framed Bathroom Vanity Mirror Instruction Manual

Allen Roth Designer 2 24 In X 26 5 Chrome Oval Frameless Bathroom Vanity Mirror The Mirrors Department At Com

Allen Roth Designer 2 24 In X 26 5 Chrome Oval Frameless Bathroom Vanity Mirror The Mirrors Department At Com

Diy Led Mirror Installation Personal Tips And Review

Allen Roth 4 75 In X 11 5 Polished Chrome Double Sided 5x Magnifying Wall Mounted Vanity Mirror With Light The Makeup Mirrors Department At Com

Allen Roth 27 5 In W X 30 H Round White Wash Framed Wall Mirror The Mirrors Department At Com

Deco Mirror 29 In W X 35 H Framed Rectangular Beveled Edge Bathroom Vanity Broe 8940 The Home Depot

Allen Roth 4 75 In X 11 5 Polished Chrome Double Sided 5x Magnifying Wall Mounted Vanity Mirror With Light The Makeup Mirrors Department At Com