DIY Barnwood Bathroom Mirror Frame: A Rustic Touch for Your Bathroom
Adding a touch of rustic charm to your bathroom can be as simple as creating a DIY barnwood mirror frame. Barnwood, with its weathered and distressed appearance, brings a natural and timeless aesthetic to any space. This project allows you to personalize your bathroom decor while adding a unique element that reflects your style.
Gathering Your Supplies
Before embarking on your DIY journey, ensure you have the necessary materials:
- Barnwood Boards: Choose boards with varying widths and lengths to create a visually interesting frame.
- Mirror: Select a mirror that complements the size and style of your bathroom.
- Wood Glue: Use a strong wood glue for securing the frame pieces.
- Wood Screws: Select screws that are appropriate for the thickness of your barnwood boards.
- Wood Stain or Paint: This is optional, but staining or painting the frame allows you to further customize its look.
- Safety Glasses and Dust Mask: Protect your eyes and lungs from debris.
- Measuring Tape and Pencil: For precise measurements and marking.
- Saw: A circular saw, miter saw, or handsaw for cutting the barnwood boards.
- Sandpaper: Use sandpaper to smooth any rough edges and prepare the wood for staining or painting.
- Clamps: To hold the frame pieces together while the glue dries.
- Drill: To pilot holes for the screws.
- Level: Ensure the mirror is hanging straight.
- Hanging Hardware: Select appropriate hardware for the weight of the mirror.
Constructing the Frame
Once you have gathered your materials, follow these steps to construct the frame:
- Measure and Cut: Measure the mirror and add an additional 2-3 inches to each side for the frame width. Cut the barnwood boards to create four pieces that will form the outer frame.
- Assemble the Frame: Use wood glue to secure the four frame pieces together, creating a rectangular shape. Apply glue to the edges and clamp the pieces together until the glue sets.
- Reinforce the Frame: For extra stability, add wood screws at the corners of the frame. Pilot holes should be drilled to prevent the wood from splitting.
- Sand and Finish: Once the glue is dry, sand the frame to smooth any rough edges. Stain or paint the frame, if desired. Allow the finish to dry completely before proceeding.
- Attach the Mirror: Position the mirror in the center of the frame. Using a pencil, mark the center point of the mirror and the center point of the frame. Attach the mirror to the frame using appropriate adhesive or hardware, ensuring it is securely fixed in place.
- Add Hanging Hardware: Attach hanging hardware to the back of the frame, ensuring it is centered and securely attached.
Customization Options
The beauty of this project lies in its adaptability. You can customize your barnwood mirror frame to match your preferred style:
- Wood Choices: You can use reclaimed barnwood for a truly rustic look or select more modern barnwood styles for a contemporary feel.
- Staining and Painting: Experiment with different wood stains to enhance the natural grain of the barnwood, or paint the frame in bold colors to create a statement piece.
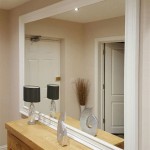
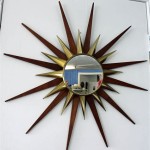
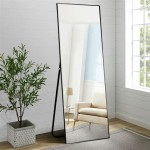
- Mirror Shape: Choose a traditional rectangular mirror or opt for a round or oval mirror for a unique touch.
With a little creativity and effort, you can create a one-of-a-kind barnwood mirror frame that will elevate the rustic charm of your bathroom. It adds a touch of warmth and personality to your space, creating a welcoming and inviting atmosphere. Embrace the beauty of natural materials and enjoy the rewarding process of DIY.

Diy Reclaimed Wood Frames The Space Between Mirror Bathroom Framed

Diy Reclaimed Wood Frames The Space Between

Diy Reclaimed Wood Frames The Space Between

Diy Rustic Bathroom Mirror Domestically Speaking

Modern Diy Rustic Mirror Frame H2obungalow

Diy Reclaimed Wood Frames The Space Between

Modern Diy Rustic Mirror Frame H2obungalow

Wood Mirror Diy Bathroom Mirrors Wooden

Bathroom Makeover Diy Barn Wood Mirror Frame Jenron Designs

Diy Reclaimed Wood Frames The Space Between