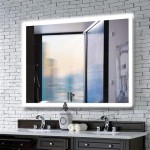
DIY Frame a Large Bathroom Mirror
Framing a large bathroom mirror elevates the aesthetic of the space, adding a touch of custom design without extensive renovation. This project can be accomplished with readily available tools and materials, offering a cost-effective way to enhance a bathroom's visual appeal. This article provides a comprehensive guide for successfully framing a large bathroom mirror.
Planning and Preparation: Accurate measurements are crucial. Measure the mirror's dimensions precisely, noting the width and height. These measurements will determine the lumber requirements for the frame. Consider the existing bathroom décor when selecting frame materials and style. A frame's thickness and profile should complement the mirror and the overall bathroom design. Research different frame styles, such as a simple flat frame, a beveled frame, or a more ornate design, to determine the best fit for the space.
Material Selection: Common framing materials include wood, composite wood, and plastic. Wood offers a classic look and can be stained or painted to match existing decor. Composite wood provides a more budget-friendly option, while plastic offers water resistance, a valuable feature in a bathroom environment. Choose a material that complements the bathroom's style and offers the desired level of durability. The frame's width should be proportional to the mirror's size. Larger mirrors typically benefit from wider frames.
Tool Assembly: Gather necessary tools before beginning the project. Essential tools include a measuring tape, a miter saw or hand saw with a miter box for accurate angle cuts, a wood glue suitable for the chosen frame material, finishing nails appropriate for the frame's thickness, a hammer, a nail set, wood filler, sandpaper, and safety glasses. Appropriate clamps for securing the frame pieces during assembly are also highly recommended.
Cutting the Frame Pieces: Using the measured mirror dimensions and chosen frame width, calculate the length of each frame piece. Remember to account for the mitered corners, typically cut at a 45-degree angle. Precision cutting is essential for a seamless frame appearance. Double-check measurements before making each cut to ensure accuracy. Utilize the miter saw or hand saw and miter box to cut each frame piece to the correct length and angle. Accurate cuts are crucial for proper frame assembly and a professional finish.
Frame Assembly: Dry-fit the frame pieces around the mirror before applying any adhesive. This step confirms proper fit and identifies any necessary adjustments. Once the dry fit is satisfactory, apply wood glue to the mitered ends of each frame piece. Carefully join the pieces together, forming a complete frame. Secure the corners with clamps, ensuring tight joints and maintaining square angles. Allow the glue to dry completely according to the manufacturer's instructions. This drying time is vital for a strong and stable frame.
Securing the Frame: After the glue has dried, reinforce the frame joints with finishing nails. Pre-drill pilot holes to prevent the wood from splitting, especially with harder wood types. Use a nail set to countersink the nail heads, creating a smooth surface for finishing. Fill the nail holes with wood filler and allow it to dry. Sand the filled areas smooth, blending them seamlessly with the frame surface. This step creates a professional and polished appearance.
Finishing the Frame: The final step involves finishing the frame to protect it from moisture and enhance its appearance. Depending on the chosen frame material, apply paint, stain, or a clear sealant. Multiple coats may be necessary for optimal protection and desired color intensity. Allow each coat to dry completely before applying the next. Consider using a sealant specifically designed for bathroom environments to provide additional moisture resistance. This extra protection will extend the frame's lifespan.
Mounting the Frame: Once the finish is completely dry, the framed mirror can be mounted. Depending on the mirror's weight and size, use appropriate mounting hardware. Ensure the mounting hardware is rated for the combined weight of the mirror and the frame. Follow the manufacturer's instructions for the chosen mounting hardware. Secure the framed mirror to the wall, ensuring it is level and securely in place. Consider using mirror adhesive in addition to mounting hardware for added stability, particularly with larger, heavier mirrors.
Safety Precautions: Throughout the project, prioritize safety. Wear safety glasses when cutting, sanding, or using power tools. Ensure adequate ventilation when working with paints, stains, or sealants. Follow manufacturer instructions for all materials and tools. Proper safety measures minimize the risk of accidents and ensure a successful project completion.

Mirror Frame Diy How To Update A Basic Bathroom Our Faux Farmhouse

How To Frame A Mirror

Mirror Frame Diy How To Update A Basic Bathroom Our Faux Farmhouse

How To Frame Out That Builder Basic Bathroom Mirror For 20 Or Less

Easy Diy Tutorial Adding Trim Around A Giant Mirror For Ers

Diy Bathroom Mirror Frame For Under 10 O Hayley Blog

Diy Stick On Mirror Frame Sawdust Sisters

Diy Bathroom Mirror Frame With Molding The Happier Homemaker

Diy Custom Modern Bathroom Mirror Frame On A Budget

Diy Bathroom Mirror Frame Without Removing Clips Her Happy Home