DIY Painted Wooden Mirror Frame: A Comprehensive Guide
Creating a custom mirror frame is a fulfilling do-it-yourself project allowing for personalized decor that reflects individual style. A wooden frame, particularly, offers versatility in design and finish, especially when employing paint to achieve the desired aesthetic. This article provides a detailed guide on constructing and painting a wooden mirror frame, from material selection to the final protective coating.
Planning and Material Selection
The initial phase of any DIY project involves meticulous planning and acquiring the necessary materials. For a painted wooden mirror frame, careful consideration should be given to the type of wood, paint, and other supplies to ensure a durable and visually appealing finished product.
Wood Selection: Several wood types are suitable for crafting a mirror frame. Pine is a common choice due to its affordability, workability, and availability. It's a softwood that readily accepts paint and stain. However, pine is prone to dents and scratches. Hardwoods like poplar, maple, or oak offer greater durability and a more refined appearance. Poplar is another paint-grade hardwood that is relatively inexpensive and easy to work with. Maple and oak possess distinctive grain patterns that can be enhanced with certain painting techniques, but they are generally more expensive and require more effort to cut and join. The size and weight of the mirror itself will dictate the necessary thickness and strength of the wood. For larger mirrors, thicker and more robust wood is essential to prevent warping or breakage. Consider using a wood thickness of at least ¾ inch for larger projects.
Mirror Measurement: Accurate mirror measurement is paramount. Measure the exact dimensions of the mirror, including its thickness. The frame's inner dimensions must precisely match the mirror's outer dimensions to ensure a snug and secure fit. Adding a slight allowance (approximately 1/16 to 1/8 inch) to the inner dimensions can facilitate easier mirror insertion and prevent undue pressure on the glass. This measurement will determine the overall dimensions of the wood pieces needed for the frame.
Paint Selection: The choice of paint significantly impacts the frame's appearance and durability. Acrylic latex paint is a popular option due to its water-based formulation, low odor, easy cleanup, and wide availability in various colors and finishes. It provides good adhesion to properly prepared wood surfaces and offers reasonable resistance to scratches and moisture. Oil-based paints offer superior durability and a richer finish, but they require more effort to apply, have a stronger odor, and necessitate mineral spirits for cleanup. They also tend to yellow over time, particularly in lighter shades. Chalk paint is another option, prized for its matte finish and ability to create a distressed or vintage look. It adheres well to most surfaces with minimal preparation and is often finished with wax for protection. Consider the desired aesthetic and the environment where the mirror will be placed when selecting the paint type.
Additional Materials: Beyond the wood and paint, several other materials are necessary for constructing and finishing the mirror frame. These include: Wood glue for joining the frame pieces; Wood filler for patching any imperfections or gaps; Sandpaper in various grits (e.g., 120, 220) for smoothing the wood surface; Primer for preparing the wood for paint and improving adhesion; Painter's tape for creating clean lines and protecting areas from paint; A paint brush, roller, or paint sprayer for applying the paint; Safety glasses and a dust mask for protecting the eyes and respiratory system; Clamps for securely holding the frame pieces together while the glue dries; A miter saw or hand saw for cutting the wood at precise angles; Measuring tape and a pencil for accurate measurements and markings; and Glazing points or clips for securing the mirror within the frame.
Construction and Assembly
Once the planning and material gathering stage is complete, the next step involves constructing and assembling the wooden mirror frame. This process entails cutting the wood to size, joining the pieces to form the frame, and preparing the frame for painting.
Cutting the Wood: Using the accurate measurements obtained earlier, carefully cut the wood pieces to the required lengths. A miter saw is ideal for creating precise 45-degree angles at the ends of each piece, which are necessary for forming the corners of the frame. Alternatively, a hand saw and miter box can be used, although achieving the same level of precision can be more challenging. When cutting the wood, always err on the side of caution and cut slightly longer than needed. The pieces can then be fine-tuned using sandpaper or a block plane to achieve the exact dimensions. Ensure that all four pieces are cut with accurate and consistent angles to create seamless corners.
Joining the Frame Pieces: With the wood pieces cut to size, the next step is to join them to form the frame. Apply a generous amount of wood glue to the mitered ends of each piece. Align the pieces carefully to create a perfect 90-degree angle at each corner. Use clamps to securely hold the pieces together while the glue dries. The clamping pressure should be sufficient to ensure a tight bond but not so excessive as to distort the wood. Allow the glue to dry completely according to the manufacturer's instructions, typically for at least 24 hours. After the glue has dried, remove the clamps and inspect the corners for any gaps or imperfections. If necessary, use wood filler to fill any gaps and allow it to dry completely.
Sanding and Preparation: Before painting, thorough sanding is essential to create a smooth and uniform surface, which will promote paint adhesion and enhance the finished appearance. Begin with a coarser grit sandpaper (e.g., 120) to remove any imperfections, such as scratches, dents, or uneven glue lines. Then, switch to a finer grit sandpaper (e.g., 220) to further smooth the surface and prepare it for priming. Sand in the direction of the wood grain to avoid creating unsightly scratches. After sanding, remove all dust and debris with a tack cloth or a damp cloth. Apply a coat of primer to the entire frame. Primer serves as a base coat that helps the paint adhere better to the wood surface and also blocks any tannins or stains from bleeding through the paint. Allow the primer to dry completely according to the manufacturer's instructions. Lightly sand the primed surface with a fine-grit sandpaper (e.g., 320) to remove any imperfections and create an even smoother surface for painting. Again, remove all dust and debris before proceeding to the painting stage.
Painting and Finishing
The final stage in creating a DIY painted wooden mirror frame involves applying the paint and adding a protective finish to ensure longevity and aesthetic appeal. This process requires patience and attention to detail to achieve a professional-looking result.
Applying the Paint: Choose the desired method of paint application – brush, roller, or sprayer. For a smooth and even finish, a high-quality brush designed for the chosen paint type is recommended. Apply the paint in thin, even coats, working in the direction of the wood grain. Avoid applying too much paint at once, as this can lead to drips, runs, and uneven coverage. Allow each coat of paint to dry completely before applying the next coat. Depending on the paint type and desired coverage, two to three coats may be necessary. If using a roller, choose a roller with a nap that is appropriate for the paint type and the desired finish. Apply the paint in smooth, overlapping strokes, being careful to avoid creating bubbles or streaks. A paint sprayer offers the advantage of a very smooth and even finish, but it requires more preparation and skill to use effectively. Mask off any areas that you do not want to be painted and follow the manufacturer's instructions for the sprayer. Regardless of the application method, maintain a consistent technique throughout the painting process to ensure a uniform and professional-looking result.
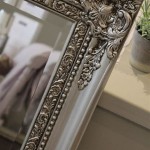
Creating Special Effects: Various painting techniques can be employed to create unique and interesting effects on the mirror frame. Distressing involves sanding away some of the paint to reveal the underlying wood or primer, creating a vintage or rustic look. This can be achieved using sandpaper, steel wool, or a sanding block. Layering different colors of paint can also create a visually appealing effect, where the top layer is partially removed to reveal the colors underneath. Antiquing glazes can be applied to enhance the details and add depth and character to the frame. Experiment with different techniques to achieve the desired aesthetic.
Sealing and Protection: Once the paint has dried completely, apply a protective topcoat to seal the paint and protect it from scratches, moisture, and UV damage. A clear polyurethane varnish is a durable and versatile option, available in various sheens, such as gloss, semi-gloss, and matte. Apply the varnish in thin, even coats, following the manufacturer's instructions. Allow each coat to dry completely before applying the next coat. Lightly sand the surface between coats with a fine-grit sandpaper (e.g., 400) to ensure a smooth and even finish. Alternatively, a furniture wax can be used as a topcoat, providing a softer and more natural-looking finish. Apply the wax with a soft cloth, working it into the surface in a circular motion. Buff the wax to a shine after it has dried completely. The choice of topcoat depends on the desired level of protection and the overall aesthetic of the mirror frame.
Once the topcoat is dry, carefully insert the mirror into the frame. Secure the mirror in place using glazing points or clips, which are small metal fasteners that hold the mirror against the back of the frame. Ensure that the mirror is securely held in place and that there are no gaps between the mirror and the frame. The finished mirror frame is now ready to be hung and enjoyed.

Tutorial Create The Weathered Wood Look With Paint Transform A Mirror

Painting A Mirror Frame Easy Yet Stunning Ideas Girl In The Garage

How To Paint A Mirror Frame Antique White Well Purposed Woman

How To Paint A Mirror Frame Furniture Flipping Mirrors

Chalk Paint And Antiquing A Frame Speil

Diy Framed Mirror Jaime Costiglio

Painted Mirror Using Paint Glaze To Enhance Details Sand And Sisal

Diy Mirror Frame Makeover Mornington Lane

How To Paint A Mirror Frame

Painting A Mirror Frame Easy Yet Stunning Ideas Girl In The Garage