DIY Small Vanity Mirror With Lights: A Comprehensive Guide
A well-lit vanity mirror is an essential component for personal grooming, makeup application, and skincare routines. While commercially available lighted vanity mirrors can be expensive and may not perfectly fit specific space requirements or aesthetic preferences, a do-it-yourself (DIY) project offers a customizable and cost-effective alternative. Constructing a small vanity mirror with lights allows for tailored dimensions, lighting configurations, and stylistic integration into any room. This article provides a detailed guide on creating a small, illuminated vanity mirror, outlining the necessary materials, tools, and step-by-step instructions.
The ability to customize the vanity mirror to precise needs is a significant advantage. Creating a small vanity mirror allows for optimizing space within smaller bathrooms, dorm rooms, or dressing areas. Furthermore, the DIY approach offers substantial cost savings compared to purchasing a pre-made lighted vanity mirror. The selection of specific components, such as the mirror itself, the lighting elements, and the frame materials, allows for the control of the project's overall cost.
Key Point 1: Planning and Material Selection
The initial stage of creating a DIY small vanity mirror with lights involves meticulous planning and careful selection of appropriate materials. This phase will define the overall design and functionality of the finished product.
Mirror Selection: The mirror's size and shape are fundamental considerations. The dimensions should be appropriate for the available space and intended use. Standard rectangular or square mirrors are readily available at hardware stores or glass suppliers. Alternatively, custom shapes or sizes can be ordered for a more personalized design. The mirror's thickness should be sufficient to prevent distortion or breakage. Opting for a mirror with a pre-applied protective backing can enhance its durability and prevent corrosion.
Lighting Options: The choice of lighting significantly impacts the mirror's functionality and aesthetic appeal. Several options are available, each with unique characteristics:
- LED Strip Lights: These are energy-efficient, long-lasting, and available in various color temperatures. They can be easily adhered to the mirror's perimeter or embedded within the frame. Dimmable LED strips provide adjustable light intensity.
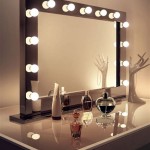
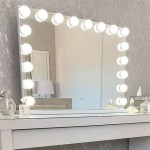
- LED Bulbs with Sockets: Traditional round or globe-shaped LED bulbs mounted within individual sockets offer a classic Hollywood-style vanity mirror appearance. Select bulbs with appropriate wattage and color temperature to achieve the desired lighting effect.
- LED Light Bars: These offer a focused and directed light source. They are typically mounted above or to the sides of the mirror.
The selection of the appropriate color temperature is important for accurate color rendering during makeup application. A color temperature between 4000K and 5000K (neutral white) is generally recommended for this purpose.
Frame Material: The frame provides structural support for the mirror and lighting elements while also contributing to the overall aesthetic. Common frame materials include:
- Wood: Provides a classic and versatile option. Different types of wood, such as pine, oak, or maple, can be selected based on desired appearance and stainability.
- Metal: Offers a sleek and modern look. Aluminum or steel frames are durable and can be finished with paint or powder coating.
- Plastic: A lightweight and cost-effective option. Plastic frames are available in various colors and finishes.
Electrical Components: Secure a power source for the selected lighting option. This may involve using a power adapter, a USB connection, or wiring to an electrical outlet. Verify the voltage and wattage requirements of the lighting elements and select a power source that meets those specifications. Include a switch for easy on/off control of the lights. This switch can be integrated into the frame or placed on the power cord.
Adhesive & Fasteners: High-strength adhesive is required to securely attach the mirror to the frame. Mirror-specific adhesive is recommended to prevent damage to the mirror's backing. Screws, nails, or other fasteners may be needed to assemble the frame and secure the lighting elements.
Safety Equipment: Safety glasses, gloves, and a dust mask are recommended during the construction process. Working with electrical components requires caution, and adherence to safety guidelines is essential.
Key Point 2: Assembly and Wiring
Once the materials have been gathered, the assembly process can begin. This stage involves constructing the frame, mounting the mirror, and integrating the lighting elements.
Frame Construction: Begin by cutting the frame material to the desired dimensions. Use a saw or miter box to create accurate and clean cuts. Assemble the frame using wood glue, screws, or nails. Ensure the frame is square and sturdy. Sand the frame to create a smooth surface, and then apply paint, stain, or other desired finish. Allow the finish to dry completely before proceeding.
Mirror Mounting: Apply mirror adhesive to the back of the mirror. Carefully position the mirror within the frame, ensuring it is centered and aligned correctly. Apply even pressure to the mirror to ensure a strong bond with the frame. Allow the adhesive to cure completely according to the manufacturer's instructions. This may take several hours or overnight.
Lighting Installation: Depending on the lighting option selected, the installation process will vary. For LED strip lights, carefully peel off the adhesive backing and adhere the strip lights to the perimeter of the mirror or the inside of the frame. For LED bulbs with sockets, mount the sockets to the frame using screws or adhesive. For LED light bars, attach them to the frame using screws or mounting brackets.
Wiring: Connect the lighting elements to the power source, following the manufacturer's instructions. If wiring to an electrical outlet, ensure the power is disconnected before beginning the wiring process. Use wire connectors or solder to create secure and insulated connections. Install a switch in the circuit to control the lights. Carefully route the wiring to prevent it from being exposed or damaged. Securing the wires with clips or zip ties can help to maintain a neat and organized appearance.
Testing: Before completing the assembly, test the lighting to ensure it is functioning correctly. Turn on the switch and verify that all lights are illuminated. Check for any loose connections or faulty wiring. If any issues are detected, disconnect the power and troubleshoot the problem before proceeding.
Key Point 3: Finishing and Safety Considerations
The final stage involves adding finishing touches and ensuring the vanity mirror is safe for use. This includes concealing wiring, adding protective features, and verifying electrical safety.
Concealing Wiring: Exposed wiring can be unsightly and potentially hazardous. Conceal the wiring by routing it through channels in the frame or using wire covers. Securing the wiring prevents strain on connections and minimizes the risk of damage. Consider adding a backing to the frame to completely enclose the wiring. This can be made from wood, plastic, or fabric.
Adding Protective Features: To prevent scratches or damage, add protective feet or pads to the bottom of the frame. This will also help to stabilize the mirror on a countertop or dressing table. Consider adding a protective coating to the mirror surface to make it easier to clean and prevent fingerprints. A glass cleaner specifically designed for mirrors is recommended.
Electrical Safety Verification: Once the assembly is complete, thoroughly inspect the wiring to ensure there are no exposed wires or loose connections. Use a multimeter to verify the continuity of the wiring and check for any short circuits. If using an electrical outlet, ensure the outlet is properly grounded. If unsure about the electrical wiring, consult a qualified electrician. A ground fault circuit interrupter (GFCI) outlet is recommended for bathrooms to prevent electrical shock.
Final Inspection and Cleaning: Conduct a final inspection of the entire vanity mirror to ensure all components are securely attached and functioning correctly. Clean the mirror and frame to remove any dust or fingerprints. Inspect the mirror for any scratches or imperfections. Test the lighting one last time to verify that it is working properly.
By following these detailed instructions, individuals can create a custom-designed small vanity mirror with lights that perfectly meets their specific needs and preferences. The DIY approach offers cost savings, customization options, and a rewarding sense of accomplishment.

Diy Vanity Mirror With Lights Under 150

Diy Light Up Vanity Mirrors You Can Make Ohmeohmy Blog

Modern Wood And Led Vanity Mirror 8 Steps With Pictures Instructables

Diy Make Up Mirror Vanity Makeup

How To Make A Diy Makeup Vanity With Hollywood Lighted Mirror

Diy Vanity Mirror With Lights Only 40

20 Diy Vanity Mirror Using Led Lights And Easy

How To Make A Diy Makeup Vanity With Hollywood Lighted Mirror

10 Diy Vanity Mirror Projects That Show You In A Diffe Light

Diy Led Lighted Vanity Mirror Girl Loves Gloss