Frame Your Bathroom Mirror DIY: A Guide to Enhancing Your Bathroom Aesthetic
Transforming your bathroom mirror with an elegant frame is a simple yet impactful DIY project that can elevate the overall ambiance of your space. Whether you prefer a classic, modern, or rustic style, framing your mirror is a versatile way to add a personal touch. Here's a detailed guide to help you achieve a stunning framed mirror that complements your bathroom decor.
Choose the Right Materials
The secret to a successful DIY project lies in selecting the right materials. Choose a frame material that aligns with your desired aesthetic and the bathroom's existing fixtures and fittings. Consider options like wood, plastic, metal, or even recycled materials for a sustainable twist. Additionally, gather essential tools such as a saw, measuring tape, miter box, clamps, glue, and sandpaper.
Measure and Cut the Frame
Begin by carefully measuring the circumference of your mirror. Using a miter box, cut the frame pieces (usually four) at 45-degree angles. This angle ensures a seamless miter joint when the pieces are assembled. Remember to double-check the fit before committing to the cuts. Sand the edges lightly to smoothen any imperfections.
Assemble and Reinforce the Frame
Assemble the frame pieces by aligning the mitered corners and applying wood glue to the joints. Clamp the pieces together to secure them while the glue dries. For added strength, you can reinforce the corners with small nails or screws. Countersink the nails or screws slightly below the surface of the frame and fill the holes with wood filler for a clean finish.
Prepare the Mirror for Mounting
Before attaching the mirror to the frame, ensure that the mirror's edges are smooth and free of debris. Use a glass cleaner or rubbing alcohol to wipe down the surface and remove any fingerprints or oils. If desired, you can add decorative trim or molding around the edges of the mirror for a more elaborate look.
Attach the Mirror to the Frame
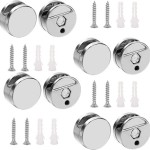
Carefully place the mirror inside the frame, aligning the edges evenly. Secure the mirror in place using mirror clips or special adhesive strips. Ensure that the mirror is held firmly without any gaps or movement. Allow the adhesive to dry completely before hanging the framed mirror on the wall.
Hang the Framed Mirror
Determine the desired placement for the framed mirror on the wall. Use a level to ensure it hangs straight. Mark the hanging points and drill pilot holes for the screws or nails. Insert the hardware and hang the mirror securely. Check its stability by gently nudging it to ensure it is securely fastened.
Touch-Ups and Finalization
Once the framed mirror is hung, inspect it for any imperfections or gaps. Fill any nail or screw holes with wood filler and paint over them to match the frame's color. For a polished finish, consider adding a clear protective sealant or lacquer to the frame to protect it from moisture and enhance its longevity. Your DIY framed mirror is now complete, ready to enhance the beauty and functionality of your bathroom.

Mirror Frame Diy How To Update A Basic Bathroom Our Faux Farmhouse

Diy Framed Bathroom Mirrors Living With Lady

Diy Stick On Mirror Frame Sawdust Sisters

Mirror Frame Diy How To Update A Basic Bathroom Our Faux Farmhouse

Diy Bathroom Mirror Frame Without Removing Clips Her Happy Home

How To Frame Out That Builder Basic Bathroom Mirror For 20 Or Less

How To Install A Mirrorchic Bathroom Mirror Frame Momhomeguide Com

How To Frame A Bathroom Mirror Easy Casa Watkins Living

How To Frame A Mirror

Easy Diy Tutorial Adding Trim Around A Giant Mirror For Ers
