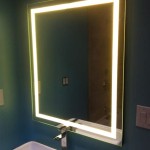
Framing a Bathroom Mirror with Pallet Wood
Framing a bathroom mirror with pallet wood offers a rustic, cost-effective way to upgrade a bathroom's aesthetic. This project can be accomplished with basic tools and readily available materials, making it suitable for DIY enthusiasts of varying skill levels. However, careful preparation and execution are crucial for achieving a professional-looking result.
The first step involves sourcing and preparing the pallet wood. Pallet wood can often be obtained for free or at a low cost from local businesses or recycling centers. It's essential to choose pallets that haven't been treated with harmful chemicals. Look for the IPPC stamp (International Plant Protection Convention) which indicates the treatment type. HT (heat treated) pallets are safe to use, while MB (methyl bromide) treated pallets should be avoided. Once suitable pallets are acquired, they need to be disassembled. A pry bar and hammer are the most effective tools for this task, although a reciprocating saw can also be used. Exercise caution during disassembly to minimize wood splitting and splintering.
After disassembly, the pallet wood must be cleaned and prepared for use. Start by removing any nails or staples remaining in the wood. A hammer and nail puller are useful for this. Next, the wood should be thoroughly cleaned using a stiff brush and soapy water to remove dirt, grime, and any lingering contaminants. Once clean, the wood needs to be dried completely before moving on to the next stage.
Planing and sanding are critical for achieving a smooth, even surface. A planer will remove any unevenness or rough patches on the wood surface. Sanding further refines the wood, removing any remaining splinters and creating a smooth finish. Start with a coarser grit sandpaper (e.g., 80 grit) and gradually move to finer grits (e.g., 120, 150, and finally 220 grit) for optimal smoothness. This careful sanding also prepares the wood to accept stain or paint more effectively.
Measuring and cutting the wood for the frame is the next crucial step. Accurate measurements are essential for ensuring a proper fit around the mirror. Measure the mirror's dimensions precisely and add the desired width of the frame to each side. Transfer these measurements to the prepared pallet wood and mark the cutting lines carefully. A miter saw is ideal for making accurate angled cuts for a professional-looking frame, particularly if the frame design involves angled corners. A hand saw can also be used, but extra care must be taken to ensure straight, accurate cuts.
Assembling the frame requires precision and the appropriate adhesive. Wood glue is typically used for joining the frame pieces. Apply a generous amount of glue to the cut edges of the wood and clamp the pieces together firmly, ensuring tight joints and proper alignment. Allow the glue to dry completely according to the manufacturer's instructions. For added stability, especially for larger frames, consider using small finishing nails or brads to reinforce the joints. Countersink the nails and fill the holes with wood putty for a seamless finish.
Finishing the frame involves staining or painting and applying a protective sealant. Staining allows the natural wood grain to show through while adding color. Painting offers a more uniform finish and can be matched to the existing bathroom decor. Apply the chosen finish evenly according to the product's instructions. Once the stain or paint has dried, apply a protective sealant. This sealant protects the wood from moisture and humidity, which are prevalent in bathroom environments. Multiple coats of sealant may be necessary for enhanced protection.
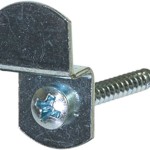
Attaching the frame to the mirror can be achieved using various methods. Construction adhesive is a common choice for secure attachment. Apply the adhesive to the back of the frame and carefully position it around the mirror. Ensure the frame is centered and level before pressing it firmly against the wall. Supporting the frame while the adhesive dries can prevent shifting. Alternatively, specialized mirror clips can be used for mounting the frame. These clips attach to the back of the frame and grip the edges of the mirror, providing a secure hold.
Considerations for bathroom environments are particularly important when working with wood. Bathroom humidity can cause wood to warp or expand. Ensuring adequate ventilation in the bathroom can help mitigate this. The choice of sealant is also vital for protecting the wood frame from moisture damage. Opting for a waterproof or water-resistant sealant is crucial for long-term durability. Regularly cleaning the frame and addressing any signs of moisture damage promptly can help maintain its appearance and structural integrity.
Variations in frame design can be implemented to personalize the finished product. Instead of simple straight cuts, consider incorporating decorative elements like beveled edges or routed designs. Different stain colors or paint techniques can also create unique visual effects. Adding embellishments like shells, stones, or tiles can further enhance the frame's aesthetic and tie it into the overall bathroom theme. Exploring different design options allows for a personalized and unique final product that complements the bathroom's style.

Rachel Schultz Framing A Bathroom Mirror With Pallets

Rachel Schultz Framing A Bathroom Mirror With Pallets

Rachel Schultz Framing A Bathroom Mirror With Pallets

Rachel Schultz Framing A Bathroom Mirror With Pallets

Diy Reclaimed Wood Frames The Space Between Mirror Bathroom Rustic Mirrors

Bathroom Renovation Diy Mirror Makeover My Happy Simple Living

Framed My Bathroom Mirror With Pallets The Towel Hanger Is A Piece Of Pallet And An Old Spo Idea Di Decorazione Decorazioni Autunnali Per La Casa

Diy Farmhouse Mirror Frame Northstory Co

How To Build And Decorate With Rustic Mirror Frames

Diy Pallet Bathroom Vanity And Mirror Pallets Pro