How To Put A Frame Around A Bathroom Mirror: A Comprehensive Guide
Framing a bathroom mirror can dramatically enhance its aesthetic appeal, transforming it from a simple reflective surface into a stylish focal point. This project, achievable by many homeowners with basic DIY skills, offers a cost-effective way to update a bathroom's decor without the expense of replacing the entire mirror. The process involves careful planning, precise measurements, and the selection of appropriate materials. This article provides a detailed guide on how to successfully frame a bathroom mirror.
Preparing for the Project: Planning and Considerations
Before commencing any physical work, careful planning is crucial. The first step involves assessing the existing mirror and the surrounding bathroom environment. Consider the size and shape of the mirror, the overall style of the bathroom, and the desired aesthetic outcome. This initial evaluation will inform material selection and the chosen framing method.
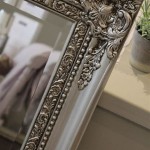
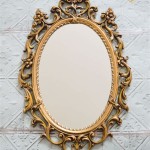
The bathroom's existing decor should heavily influence the frame's design. A modern bathroom might benefit from a sleek, minimalist frame made of metal or a dark wood stain. Conversely, a more traditional bathroom could accommodate a decorative frame with ornate details or a lighter finish. Consider the color palette of the bathroom to ensure the frame complements the existing design elements, such as the vanity, tile, and fixtures.
Beyond aesthetics, it's important to consider the practical aspects. Bathrooms are typically high-humidity environments. Therefore, the chosen frame material must be resistant to moisture. Solid wood, when properly sealed, is a popular choice, but alternatives like PVC or composite materials offer excellent water resistance. Metal frames, particularly those made of aluminum or stainless steel, are also viable options.
Accurate measurements are paramount to a successful framing project. Measure the mirror's dimensions (length and width) precisely. This information will be used to calculate the required amount of framing material. Consider whether the frame will overlap the mirror's edges or sit flush against them. Overlapping frames are generally easier to install, as they provide a degree of forgiveness in terms of precise cutting. However, flush frames offer a cleaner, more integrated look.
Budget is another important consideration. Frame materials range in price from inexpensive lumber to high-end hardwoods and metals. Setting a budget beforehand will help narrow down material choices and prevent overspending. Don't forget to factor in the cost of necessary tools, adhesives, sealants, and finishing products.
Selecting Materials and Tools
The selection of appropriate materials is critical for both the aesthetic appeal and the longevity of the framed mirror. Common framing materials include wood, metal, PVC, and composite materials, each with its own advantages and disadvantages.
Wood is a versatile and aesthetically pleasing choice, offering a wide range of species, grains, and colors. However, wood is susceptible to moisture damage if not properly sealed. Hardwoods like oak, maple, and cherry are durable and attractive, but softer woods like pine may be more cost-effective. If using wood, ensure it is kiln-dried to minimize warping or cracking due to humidity fluctuations.
Metal frames offer a sleek, modern look and are highly resistant to moisture. Aluminum is a lightweight and corrosion-resistant option, while stainless steel provides a more robust and durable alternative. Metal frames may require specialized tools for cutting and joining.
PVC and composite materials are excellent choices for high-humidity environments, as they are completely waterproof. These materials are available in a variety of colors and finishes, mimicking the look of wood or metal. PVC frames are relatively easy to cut and install, making them a popular choice for DIY projects.
In addition to the framing material, consider the adhesive or fasteners that will be used to attach the frame to the mirror. Mirror mastic is a specifically formulated adhesive that is safe for use on reflective surfaces and provides a strong, permanent bond. Double-sided mirror tape can also be used, particularly for lighter frames. Mechanical fasteners, such as screws or nails, may be necessary for heavier frames, but care must be taken to avoid damaging the mirror.
Essential tools for this project typically include a measuring tape, a level, a saw (miter saw or hand saw), a miter box (for precise angled cuts), a drill (if using screws), sandpaper, a caulking gun, and safety glasses. Depending on the chosen material, specialized tools may be required, such as a metal cutter or a PVC pipe cutter.
Finally, gather necessary finishing products, such as wood stain, paint, sealant, and caulk. Choose products that are specifically formulated for use in bathrooms and that are resistant to moisture and mildew. A high-quality sealant will prevent water from seeping behind the frame and damaging the mirror or the wall.
Step-by-Step Installation Process
The installation process requires careful attention to detail and adherence to safety precautions. The following steps provide a detailed guide to framing a bathroom mirror:
Step 1: Preparation. Begin by thoroughly cleaning the mirror surface with a glass cleaner. Remove any dust, dirt, or fingerprints. Protect the surrounding areas with drop cloths or painter's tape to prevent damage from adhesives or sealants.
Step 2: Cutting the Frame Pieces. Using the accurate measurements obtained earlier, cut the frame pieces to the appropriate lengths. Use a miter saw or a miter box and hand saw to create 45-degree angled cuts at the ends of each piece, ensuring that the frame will fit snugly around the mirror. Double-check the measurements and the angles before proceeding.
Step 3: Assembling the Frame. Assemble the frame pieces on a flat, stable surface. Use wood glue or a suitable adhesive to join the corners of the frame. Clamp the corners together until the adhesive has fully cured. If using screws or nails, pre-drill pilot holes to prevent splitting the wood. Ensure the frame is square by measuring the diagonals; they should be equal.
Step 4: Finishing the Frame. Once the frame is assembled and the adhesive has cured, sand any rough edges or imperfections. Apply the desired finish to the frame, such as wood stain, paint, or sealant. Allow the finish to dry completely according to the manufacturer's instructions. Multiple coats may be necessary to achieve the desired color and protection.
Step 5: Attaching the Frame to the Mirror. Apply mirror mastic or double-sided mirror tape to the back of the frame. Distribute the adhesive evenly to ensure a strong, secure bond. Carefully position the frame around the mirror, ensuring it is centered and level. Press the frame firmly against the mirror and hold it in place for the recommended time, as specified by the adhesive manufacturer. For heavier frames, consider using temporary supports, such as painter's tape or shims, to hold the frame in place while the adhesive cures.
Step 6: Sealing the Frame. Apply a bead of caulk around the perimeter of the frame where it meets the mirror and the wall. This will prevent water from seeping behind the frame and damaging the mirror or the wall. Smooth the caulk with a wet finger or a caulking tool to create a clean, professional finish.
Step 7: Final Touches. Remove any temporary supports or painter's tape. Clean the mirror surface with a glass cleaner to remove any smudges or fingerprints. Inspect the frame for any imperfections and make any necessary repairs or touch-ups. Allow the caulk and sealant to fully cure before exposing the framed mirror to moisture.

How To Install A Mirrorchic Bathroom Mirror Frame Momhomeguide Com

The Kids Bathroom Mirror Gets Framed House Of Hepworths

How To Frame A Bathroom Mirror

Diy Bathroom Mirror Frame With Molding The Happier Homemaker

How To Add A Frame Your Bathroom Mirror

Bathroom Mirror Frames 2 Easy To Install Sources A Diy Tutorial Retro Renovation

Diy Stick On Mirror Frame Sawdust Sisters

How To Frame Out That Builder Basic Bathroom Mirror For 20 Or Less

Diy Mirror Frame Remodelaholic

How To Easily Make A Custom Mirror Frame