How to Add a Border to a Bathroom Mirror
Adding a border to a bathroom mirror is a simple yet effective way to enhance its aesthetic appeal and elevate the overall bathroom design. This project can be accomplished with various materials and techniques, offering options for diverse skill levels and budgets.
Choosing the Right Border Material
Selecting the appropriate border material is crucial. Factors such as the existing bathroom décor, desired aesthetic, and budget influence this decision. Popular options include wood, tile, mosaic, and metal.
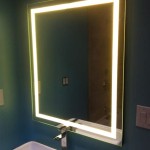
Wood offers a classic and versatile look, adaptable to various design styles. Different wood species, stains, and finishes provide flexibility in achieving the desired aesthetic. Tile borders offer durability and water resistance, making them a practical choice for bathroom environments. A wide variety of tile styles, colors, and patterns allows for extensive customization. Mosaic borders offer intricate designs and a unique artistic touch, adding a focal point to the bathroom. Metal borders contribute a contemporary and sleek appearance, often utilizing materials like aluminum or stainless steel for their durability and resistance to moisture.
Preparing the Mirror and Surface
Proper preparation ensures a successful and long-lasting border application. The mirror surface should be thoroughly cleaned with a glass cleaner to remove any dirt, grime, or residue. Any existing sealant or adhesive around the mirror's edges should be carefully removed.
If the chosen border material requires adhesive, ensuring a clean and dry surface is essential for strong adhesion. The surrounding wall area should also be cleaned and prepared according to the specific requirements of the chosen material. For example, tile application may require a layer of backer board for proper installation.
Measuring and Cutting the Border Material
Accurate measurements are crucial for a seamless and professional-looking border. Measure the mirror's dimensions precisely, accounting for the desired border width. Transfer these measurements to the chosen border material, marking cutting lines carefully.
Cutting techniques vary depending on the material. Wood can be cut with a saw, while tile and mosaic may require specialized tile cutters or nippers. Metal borders may necessitate metal shears or a cutting wheel. Safety precautions, such as wearing appropriate eye protection and gloves, are essential during the cutting process.
Applying the Border
The application method depends on the chosen material and the specific product being used. Adhesives, such as construction adhesive or mirror mastic, are commonly used for applying wood, tile, and mosaic borders. Following the manufacturer's instructions regarding adhesive application and drying times is crucial.
For tile and mosaic applications, spacers can ensure even grout lines. After the adhesive has dried, grout is applied to fill the spaces between the tiles, enhancing the border's visual appeal and providing a watertight seal. Metal borders may utilize adhesive or mechanical fasteners, depending on the specific design and installation method.
Finishing Touches
Once the border is securely in place, finishing touches complete the project. Excess adhesive should be carefully removed, and any gaps or imperfections can be filled with sealant or caulk. For wood borders, applying a sealant or varnish protects the wood from moisture and enhances its durability.
Allow ample drying time for all adhesives, sealants, and finishes before using the bathroom. This ensures proper curing and prevents damage to the newly installed border. Regular cleaning and maintenance will help preserve the border's appearance and extend its lifespan.
Addressing Common Challenges
Several challenges may arise during the border application process. Uneven mirror edges can make it difficult to achieve a straight and consistent border. In such cases, using shims or a flexible border material can compensate for irregularities. Dealing with corners requires precise miter cuts for a seamless transition. Practicing miter cuts on scrap material can help ensure accurate angles and a professional finish.
Choosing the correct adhesive for the chosen border material and the bathroom environment is also essential. Consider factors such as moisture resistance and bonding strength when selecting an adhesive. Proper ventilation during the application and drying process helps minimize fumes and ensures proper adhesion.

How To Frame Out That Builder Basic Bathroom Mirror For 20 Or Less

Mirror Frame Diy How To Update A Basic Bathroom Our Faux Farmhouse

Easy Diy Tutorial Adding Trim Around A Giant Mirror For Ers

Diy Stick On Mirror Frame Sawdust Sisters

Diy Bathroom Mirror Frame Without Removing Clips Her Happy Home

How To Frame A Mirror

Mirror Frame Diy How To Update A Basic Bathroom Our Faux Farmhouse

Diy Bathroom Mirror Frame For Under 10 O Hayley Blog

How To Frame Out That Builder Basic Bathroom Mirror For 20 Or Less

Diy Bathroom Mirror Frame For Under 10 O Hayley Blog