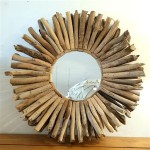
How to Add Wood Trim to a Mirror
Adding a wood trim to a mirror elevates its aesthetic appeal, transforming a simple looking glass into a stylish piece of home decor. This relatively straightforward project can be accomplished with a few basic tools and readily available materials. This article outlines the steps involved in adding a wood frame to an existing mirror.
1. Gathering Materials and Tools
Proper preparation is crucial for any successful DIY project. Before starting, gather the necessary materials and tools. These include:
- Mirror (existing or new)
- Wood trim (1x2, 1x3, or 1x4 depending on desired frame width)
- Measuring tape
- Miter saw (or hand saw with miter box)
- Wood glue
- Finishing nails (small gauge)
- Hammer
- Wood putty
- Sandpaper (medium and fine grit)
- Wood stain or paint (optional)
- Clear coat sealant (optional)
- Safety glasses
- Work gloves
2. Measuring and Cutting the Wood
Accurate measurements are essential for creating a well-fitting frame. Carefully measure the length and width of the mirror. Add twice the width of the chosen wood trim to each measurement to account for the frame overlap. For example, for a mirror 24 inches wide and 36 inches tall, using a 2-inch wide trim, the calculated cuts would be 28 inches and 40 inches respectively.
Using a miter saw, cut the wood trim at 45-degree angles. Two pieces should be cut to the length measurement, and two to the width measurement. Ensure the angles are precise to create tight, seamless corners.
3. Assembling the Frame
Dry fit the cut pieces around the mirror to confirm a snug fit. Adjustments can be made at this stage by carefully sanding down any excess wood. Once satisfied with the fit, apply wood glue to the mitered edges of the frame pieces.
Carefully join the pieces together around the mirror, ensuring the corners are flush. Secure the frame by using finishing nails driven at an angle through the back of the trim and into the wood. Avoid driving nails too close to the edge of the trim to prevent splitting.
4. Filling and Sanding
Once the glue is dry, fill any nail holes and gaps in the corners with wood putty. Allow the putty to dry completely according to the manufacturer's instructions. After drying, sand the entire frame with medium grit sandpaper, then follow up with fine grit sandpaper to achieve a smooth surface.
5. Finishing the Frame (Optional)
This step is optional but highly recommended for enhanced aesthetics and protection. Apply a wood stain or paint in the desired color to the frame. Allow each coat to dry thoroughly before applying subsequent coats. A clear coat sealant can then be applied to protect the finish and add durability.
6. Attaching Hanging Hardware (Optional)
If the mirror does not already have hanging hardware, it can be added at this stage. D-ring hangers or wire hanging kits are commonly used. Follow the manufacturer's instructions for installation, ensuring the hardware is appropriately sized and positioned for secure hanging.
7. Considerations for Different Mirror Types
The process outlined above is generally applicable to most standard mirrors. However, certain mirror types may require specific considerations:
- Beveled Mirrors: Beveled mirrors have angled edges. Account for the bevel width when measuring and cutting the frame to ensure proper coverage.
- Frameless Mirrors: Frameless mirrors offer a clean aesthetic. Ensure the frame overlaps the mirror edge evenly on all sides.
- Large Mirrors: For large and heavy mirrors, consider using stronger adhesives and additional support brackets to ensure the frame remains securely attached.
8. Tips for a Professional Finish
Achieving a professional-looking finished product involves attention to detail and a few helpful tips:
- Use a miter clamp: Miter clamps help hold the frame pieces together securely while the glue dries, ensuring tight and even joints.
- Pre-stain wood conditioner: Applying wood conditioner before staining helps to achieve a more even and consistent color, especially on softer woods.
- Protect the mirror surface: Use painter's tape to protect the mirror surface from glue, putty, and stain during the framing process.
- Consider decorative elements: Add decorative elements such as molding or carved details to further personalize the framed mirror.
By following these steps and considerations, adding a wood trim to a mirror can be accomplished with satisfying results, enhancing the mirror's appearance and adding a personal touch to any space.

Easy Diy Tutorial Adding Trim Around A Giant Mirror For Ers

Mirror Frame Diy How To Update A Basic Bathroom Our Faux Farmhouse

Easy Diy Tutorial Adding Trim Around A Giant Mirror For Ers

How To Frame A Mirror

Mirror Frame Diy How To Update A Basic Bathroom Our Faux Farmhouse

Diy Bathroom Mirror Frame With Molding The Happier Homemaker

Easy Diy Tutorial Adding Trim Around A Giant Mirror For Ers

How To Frame A Mirror Sand And Sisal

How To Frame Out That Builder Basic Bathroom Mirror For 20 Or Less

How To Frame Out That Builder Basic Bathroom Mirror For 20 Or Less