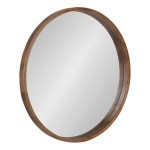
How To Frame A Builder Grade Mirror
Builder-grade mirrors, while functional, often lack the aesthetic appeal that elevates a bathroom or other space. Framing these mirrors offers a cost-effective way to add substantial visual interest and personalize a room. This process requires few specialized tools and can be completed with readily available materials, making it an ideal project for DIY enthusiasts of all skill levels.
Before beginning the project, accurate measurements are crucial. Using a tape measure, determine the precise height and width of the mirror. These measurements will dictate the dimensions of the frame. It's recommended to double-check the measurements to ensure accuracy and avoid costly mistakes.
Choosing the right frame material depends on the overall design aesthetic and budget. Common options include wood, MDF (medium-density fiberboard), and polystyrene. Wood offers a classic and versatile look, available in various species and finishes. MDF provides a smooth, paintable surface and is generally less expensive than wood. Polystyrene offers a lightweight and budget-friendly option, often pre-finished or easily paintable.
Once the material is selected, it's time to cut the frame pieces. For wood or MDF, a miter saw is the preferred tool for achieving clean, angled cuts for a professional finish. A miter box and hand saw can also be used, although it requires more precision and effort. Polystyrene can often be cut with a utility knife or fine-tooth saw. Four pieces should be cut: two for the sides, equal to the height of the mirror, and two for the top and bottom, equal to the width of the mirror. These pieces should be cut with 45-degree angles at each end, so the joined corners form a 90-degree angle.
After cutting, it's essential to dry-fit the frame pieces around the mirror. This step confirms accurate measurements and ensures a proper fit. Minor adjustments can be made to the frame pieces if necessary before applying adhesive.
The next step involves securing the frame pieces together. Wood glue is a strong and reliable adhesive for wood and MDF frames. Apply a generous amount of glue to the mitered edges of each piece, ensuring thorough coverage. Then, carefully join the pieces together, forming the frame. Clamps can be used to hold the frame firmly in place while the glue dries. For polystyrene frames, specialized adhesive designed for this material is recommended.
Once the glue has dried completely, further secure the frame with finishing nails. These small nails, driven through the mitered joints, provide additional strength and stability. Wood filler can be used to conceal the nail holes, creating a seamless finish.
Before attaching the frame to the mirror, consider adding a backing for extra support and to prevent dust and moisture from accumulating behind the mirror. A thin piece of plywood or hardboard cut to the same size as the mirror works well for this purpose.
Attaching the frame to the mirror can be achieved using various methods. Construction adhesive offers a strong bond and is suitable for most frame materials. Apply a bead of adhesive to the back of the frame and carefully position it over the mirror. Mirror clips, small metal brackets designed specifically for this purpose, provide additional support and can be used in conjunction with adhesive. These clips are typically attached to the back of the frame and then secured to the wall or the mounting points of the mirror.
Once the frame is securely attached, allow the adhesive to fully cure according to the manufacturer's instructions. This ensures a strong and lasting bond.
Finishing the frame enhances its appearance and protects the material. Wood frames can be stained, painted, or sealed with a clear coat to preserve the natural grain. MDF frames can be painted or primed and painted to match the surrounding décor. Polystyrene frames often come pre-finished, but they can also be painted if desired. Allow the finish to dry completely before hanging or reinstalling the mirror.
The final step involves hanging or reinstalling the framed mirror. If the original mirror had hanging hardware, this can often be reused. Alternatively, new hanging hardware, such as D-rings or wire hangers, can be attached to the back of the frame. Ensure the hardware is rated for the weight of the framed mirror.
Carefully measure and mark the desired location for the mirror on the wall. Use a level to ensure the mirror hangs straight. Then, install the appropriate wall anchors and hang the mirror securely. With the newly framed mirror in place, the room's aesthetic is instantly upgraded, reflecting the effort and attention to detail invested in the project.

How To Frame A Builder Grade Mirror The Turquoise Home

How To Frame A Builder Grade Bathroom Mirror At Home In The Wildwood

How To Frame A Builder Grade Mirror The Turquoise Home

How To Frame A Builder Grade Mirror Sew Woodsy

How To Frame A Bathroom Mirror Nest For Less

Framing A Builder Grade Mirror That Is Not Between Two Walls

How To Frame A Builder Grade Mirror Robyn Johanna

Diy Double Framed Mirror Builder Grade Upgrade I M Home

How To Easily Frame A Builder Grade Mirror House Full Of Summer Coastal Home Lifestyle

Build A Wood Mirror Frame With This Easy Diy Building Bluebird