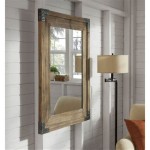
How To Frame a Full-Length Mirror DIY
Framing a full-length mirror elevates its appearance, transforming a simple reflective surface into a stylish home decor piece. This process is achievable with basic DIY skills and readily available materials. This article provides a comprehensive guide to framing a full-length mirror.
Planning and Preparation: Accurate measurements are crucial. Measure the mirror's height and width precisely. These measurements determine the lumber dimensions and the amount of other materials needed. Consider the desired frame style and width when calculating material quantities. Sketching the frame design on paper can be beneficial for visualizing the final product and ensuring accurate calculations.
Material Selection: Various materials can be used for framing. Popular choices include wood, MDF (medium-density fiberboard), and polystyrene molding. Wood offers a classic and versatile aesthetic, available in various species and finishes. MDF is a cost-effective and easy-to-work-with option. Polystyrene molding provides a lightweight and decorative alternative. The chosen material should complement the existing decor.
Gathering Tools and Supplies: Having the necessary tools and supplies on hand streamlines the framing process. Essential tools include a measuring tape, miter saw or hand saw with a miter box, wood glue, clamps, safety glasses, and a drill with appropriate drill bits. Necessary supplies include the chosen framing material, finishing nails, wood filler, sandpaper, and the desired paint or stain.
Cutting the Frame Pieces: Accurate cutting is essential for a professional-looking frame. Using the previously recorded measurements, mark the frame material pieces. A miter saw or hand saw with a miter box is recommended for achieving precise 45-degree angles for clean corner joints. Double-checking measurements before cutting minimizes errors and material waste.
Assembling the Frame: Dry-fitting the frame pieces before applying glue ensures a proper fit. Apply wood glue to the mitered edges and firmly join the pieces, forming a rectangular frame. Secure the corners with clamps until the glue dries completely, typically according to the manufacturer's instructions. This step establishes a strong and stable frame structure.
Attaching the Frame to the Mirror: Lay the mirror face down on a protected surface. Position the assembled frame on top of the mirror, ensuring proper alignment. Secure the frame to the mirror using finishing nails or mirror adhesive clips, depending on the frame material and mirror backing. Spacing the fasteners evenly distributes the weight and pressure.
Finishing the Frame: Fill any nail holes with wood filler and allow it to dry completely. Sand the frame surface smooth, removing excess filler and creating a uniform finish. Apply the desired paint or stain, following the manufacturer's instructions. Multiple coats may be required for optimal coverage and color saturation. Allow each coat to dry thoroughly before applying the next.
Adding Backing and Hanging Hardware: Attach a backing board to the frame for added stability and protection for the mirror. This can be a piece of thin plywood or hardboard cut to fit the frame's interior dimensions. Secure the backing board with small nails or adhesive. Install appropriate hanging hardware, such as D-rings or wire, on the back of the frame for secure wall mounting. Consider the mirror’s weight and choose hardware accordingly.
Safety Precautions: Throughout the framing process, prioritize safety. Wear safety glasses to protect eyes from dust and debris. Use caution when operating power tools, following manufacturer's instructions. Ensure adequate ventilation when working with paints, stains, and adhesives. Properly dispose of any hazardous materials according to local regulations.
Customization Options: The basic framing technique can be customized to create unique designs. Consider adding decorative elements such as molding, trim, or appliqués. Experiment with different paint finishes, distressing techniques, or gilding for a personalized touch. Integrating the frame design with the surrounding decor enhances the overall aesthetic appeal.
Alternative Methods: While the described method utilizes a traditional frame construction, alternative methods exist. Adhesive-backed frame molding simplifies the process, eliminating the need for miter cuts and assembly. Repurposing existing materials, such as reclaimed wood or vintage picture frames, offers a sustainable and creative approach. Explore various techniques to find the method best suited to individual skill levels and design preferences.
Maintenance and Care: Proper maintenance preserves the framed mirror's appearance. Dust the frame regularly with a soft cloth. Clean spills promptly to prevent staining or damage. Avoid harsh chemicals or abrasive cleaners that could scratch the frame's finish. Periodically inspect the hanging hardware to ensure it remains secure. Following these practices extends the life of the framed mirror and maintains its aesthetic appeal.

Full Length Mirror Rogue Engineer

Full Length Mirror Diy Frame 1905 Farmhouse

Full Length Mirror Rogue Engineer

Diy Full Length Mirror Frame

Diy Full Length Mirror With Storage Addicted 2

Diy Wooden Farmhouse Full Length Mirror Simplylifewithallison

Diy Full Length Mirror Frame

Diy Modern Mirror Re Frame What Not To Do Kayla Simone Home

Diy Full Length Mirror Shanty 2 Chic

Diy Framed Full Length Mirror Under 20