How To Hang A Mirror On The Wall With Hooks
Hanging a mirror securely and aesthetically pleasing on a wall requires careful planning and execution. This article provides a comprehensive guide to using hooks for this purpose, covering various aspects from assessing the mirror's weight to ensuring proper placement and securing it firmly to the wall.
Assessing the Mirror and Wall
Before beginning the hanging process, it is crucial to evaluate both the mirror and the wall. This assessment informs decisions about the appropriate type of hooks and hanging method. Key considerations include:
- Weight of the mirror: Heavier mirrors necessitate stronger hooks and potentially more anchoring points.
- Wall material: Different wall materials (drywall, plaster, concrete, etc.) require specific types of wall anchors and screws.
- Mirror backing: The type of backing on the mirror influences how it can be hung. D-rings, wire, or keyhole slots are common.
- Desired placement: Consider the height and surrounding décor to determine the ideal placement of the mirror.
Choosing the Right Hooks
The selection of appropriate hooks is paramount for safety and stability. The chosen hooks must be capable of supporting the weight of the mirror. Several hook types are suitable for hanging mirrors:
- Heavy-duty picture hooks: These hooks are designed for heavier items and typically utilize angled nails for secure anchoring.
- Mirror plates: These specialized plates often have adhesive backing and are designed for lighter mirrors, providing a flush mounting.
- J-hooks: These hooks are ideal for mirrors with D-rings or wire hangers, distributing the weight evenly.
- French cleats: These offer a robust and discreet hanging solution, especially for heavier mirrors, by interlocking two pieces, one attached to the wall and the other to the mirror.
Gathering Necessary Tools and Materials
Having the right tools and materials readily available streamlines the hanging process. Ensure the following are within reach:
- Measuring tape: Accurate measurements are vital for proper placement and leveling.
- Pencil: Marking the desired location on the wall ensures precision.
- Level: Ensures the mirror hangs straight.
- Drill (if needed): Required for installing anchors in certain wall types.
- Screwdriver: Essential for driving screws into the wall or tightening hooks.
- Wall anchors (if needed): Provide added support and stability, especially in drywall or plaster.
- Hammer (if using picture hooks): For driving nails into the wall.
- Stud finder (optional): Locating wall studs offers the most secure anchoring points.
- Safety glasses: Protect eyes from dust and debris during drilling or hammering.
Marking the Wall and Installing Hooks
Accurate marking and proper installation of the hooks are critical for a secure and level hang. Follow these steps:
- Measure and mark the desired center point of the mirror on the wall.
- Measure the distance between the hanging hardware on the back of the mirror (D-rings, wire, keyhole slots).
- Transfer these measurements to the wall, marking the locations for the hooks.
- If using anchors, pre-drill the holes before installing the anchors.
- Install the hooks according to the manufacturer’s instructions, ensuring they are securely fastened.
Hanging the Mirror and Final Adjustments
Once the hooks are securely installed, carefully hang the mirror. Final adjustments ensure the mirror is level and stable.
- Carefully lift the mirror and align the hanging hardware with the installed hooks.
- Check the mirror with a level to ensure it is straight. Adjust as necessary.
- Gently push or pull on the mirror to confirm its stability.
Special Considerations for Heavy Mirrors
For exceptionally heavy mirrors, extra precautions are necessary to ensure safety and stability. These may include:
- Using multiple hooks or a French cleat system to distribute the weight.
- Anchoring into wall studs whenever possible.
- Using heavy-duty wall anchors rated for the weight of the mirror.
- Seeking assistance when lifting and hanging the mirror to prevent accidents.
Alternative Hanging Methods for Mirrors Without Hardware
Mirrors lacking pre-installed hanging hardware require alternative methods for secure attachment. Options include:
- Adhesive mirror hangers: Suitable for lighter mirrors, these provide a no-drill solution.
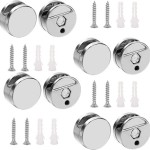
- Mirror mounting clips: These clips grip the edges of the mirror and attach to the wall with screws.
- Applying D-rings or wire to the back of the mirror: This allows for hanging with traditional hooks or wire systems.
Safety Precautions Throughout the Process
Safety should be a primary concern throughout the entire process. Observe the following precautions:
- Wear appropriate safety glasses when drilling or hammering.
- Ensure the ladder is stable and on a level surface when working at height.
- Handle the mirror carefully to avoid breakage or injury.
- If unsure about any aspect of the process, consult a professional handyman or contractor.

How To Hang A Heavy Mirror The Home Depot
How To Hang A Heavy Mirror On Drywall Without Damaging It Or The Wall Quora

How To Hang A Heavy Mirror The Home Depot

3 Simple Ways To Hang A Mirror On Wall Without Nails Wikihow

How To Hang A Heavy Mirror Lowe S
:strip_icc()/ScreenShot2022-04-28at1.12.19PM-e055476c70c6438585fa7c5cd531edcf.png?strip=all)
4 Easy Ways To Hang A Heavy Mirror

How To Hang A Heavy Mirror With Pictures Wikihow

How To Hang A Large Or Heavy Mirror

The Mirror Hanging Trick C R A F T

3 Simple Ways To Hang A Mirror On Wall Without Nails Wikihow

