How to Make Antique Mirror Glass
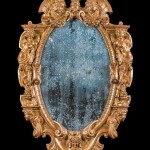
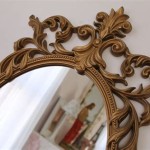
Antique mirror glass carries a unique charm, evoking a sense of history and elegance. This weathered look, characterized by speckled imperfections and a softer reflection, can be replicated using various techniques. This article explores several methods for creating the antique mirror effect, outlining the necessary materials and providing step-by-step instructions for each process.
One popular technique utilizes a specialized antiquing solution. These commercially available solutions react with the silver backing of the mirror, creating the desired aged appearance. Before beginning, ensure the mirror surface is thoroughly cleaned using glass cleaner and a lint-free cloth. Any residual dirt or grease can interfere with the antiquing process, resulting in uneven or blotchy results.
Once the mirror is clean and dry, the antiquing solution can be applied. Carefully follow the manufacturer’s instructions, as the application process and required time can vary between products. Some solutions are sprayed onto the mirror, while others require dabbing or brushing. Proper ventilation is essential when working with these chemical solutions.
After the solution has reacted with the mirror, it’s typically rinsed off with water. Multiple applications may be necessary to achieve the desired level of antiquing. Once the desired effect is achieved, allow the mirror to dry completely before handling. A protective sealant can be applied to further protect the antique finish and enhance its longevity.
A more hands-on approach involves creating a faux antique effect using paint. This method offers greater control over the final appearance, allowing for customization of the color and texture of the antiquing. Begin by preparing the mirror surface, ensuring it is clean and free of any debris. A primer designed for glass surfaces is then applied to ensure proper paint adhesion.
Once the primer has dried, a base coat of paint, typically a metallic color like silver or gold, is applied. This base coat simulates the reflective backing of a traditional mirror. Allow the base coat to dry thoroughly before proceeding to the next step.
The antiquing effect is achieved by layering a darker, contrasting paint color over the base coat. This top coat can be applied using various techniques to create different textures. A sea sponge can be used for a mottled, aged effect, while dry brushing creates a more subtle, worn appearance. Experimenting with different application techniques is encouraged to achieve the desired aesthetic.
A layer of clear varnish can be applied to protect the painted surface and further enhance the aged appearance. This method allows for greater creative freedom, making it a popular choice for DIY enthusiasts and professional artisans.
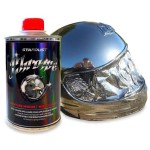
Another approach utilizes hydrochloric acid, offering a more authentic antiquing effect. This method, however, requires extreme caution and proper safety precautions due to the hazardous nature of the acid. Protective gloves, eyewear, and a respirator are mandatory when working with hydrochloric acid. The process should be conducted in a well-ventilated area, preferably outdoors.
Before beginning, the mirror surface must be thoroughly cleaned. The hydrochloric acid is then diluted with water according to the manufacturer's instructions. The diluted acid is applied to the mirror surface, reacting with the silver backing to create the antique effect.
The reaction time is carefully monitored, as overexposure to the acid can damage the mirror. Once the desired level of antiquing is achieved, the acid solution is neutralized with a baking soda solution and rinsed thoroughly with water. The mirror is then allowed to dry completely.
Beyond these chemical methods, alternative techniques can create similar effects. Applying a mixture of vinegar and water to the mirror can produce a subtle aged appearance. Experimenting with different ratios can yield varying degrees of antiquing. This method is less aggressive than the chemical methods, making it suitable for delicate or vintage mirrors.
Creating an antique mirror finish is a rewarding process that can add a touch of vintage elegance to any space. Whether using specialized antiquing solutions, paint, or more traditional methods, the key lies in understanding the process and exercising patience and precision. By following the appropriate steps and safety precautions, one can successfully achieve the desired antique mirror effect.

Diy Antique Mirror Easy To Do And Looks Authentic My Creative Days

How To Antique A Mirror Easy Diy Tutorial

The Ultimate Guide On Diy Antique Mirrors So Much Better With Age

How To Antique A Mirror Easy No Scratching The Navage Patch

Diy Antique Mirror Easy To Do And Looks Authentic My Creative Days

The Ultimate Guide On Diy Antique Mirrors So Much Better With Age

How To Antique A Mirror From The Front With Paint Average But Inspired

How To Antique A Mirror Easy No Scratching The Navage Patch

How To Antique Mirror Using Paint Stripper And Bleach Decor Adventures

Diy Mercury Glass Gilded Mirror Made From Old Photo Frames