How To Make Your Own Floor Mirror
Creating a custom floor mirror offers a rewarding way to personalize living spaces. This project allows for control over the mirror's size, frame style, and overall aesthetic, resulting in a piece uniquely suited to individual preferences and interior design needs. This guide provides a step-by-step process for constructing a floor mirror.
Materials Required:
The following materials are necessary for this project:
- Mirror glass (cut to desired dimensions)
- Wood boards (for the frame)
- Wood glue
- Wood screws
- Measuring tape
- Pencil
- Safety glasses
- Work gloves
- Saw (e.g., miter saw, circular saw)
- Drill
- Screwdriver
- Sandpaper (various grits)
- Wood stain or paint (optional)
- Polyurethane sealant (optional)
- Mirror adhesive
- Heavy-duty mirror clips (optional)
Step 1: Planning and Measuring:
Begin by determining the desired dimensions of the finished mirror. Accurate measurements are critical for both the mirror glass and the frame. Consider the space where the mirror will be placed to ensure appropriate sizing. Measure and record the length and width of the mirror glass.
Step 2: Cutting the Frame Pieces:
Using the measurements from Step 1, calculate the required lengths for the frame pieces. The frame will consist of four pieces: two for the length and two for the width. When cutting the wood, ensure a 45-degree angle at each end for proper joining (mitered corners). A miter saw provides the most accurate cuts for this purpose.
Step 3: Assembling the Frame:
Lay the cut frame pieces on a flat surface, arranging them to form a rectangle. Apply wood glue to the mitered edges of each connecting piece. Carefully join the pieces together, ensuring they are flush and square. Secure the corners by clamping them firmly. Allow the glue to dry completely according to the manufacturer's instructions.
Step 4: Reinforcing the Frame (Optional):
For added stability, particularly with larger mirrors, consider reinforcing the frame. This can be achieved by adding corner braces or by screwing small L-brackets to the inside corners of the frame. This step will provide extra support and prevent warping over time.
Step 5: Sanding and Finishing the Frame:
Once the glue is dry, sand the entire frame using progressively finer grits of sandpaper. Start with a coarser grit to remove any excess glue or imperfections, and gradually move to finer grits for a smooth finish. This preparation ensures a professional look and improves the adhesion of any stain or paint.
Step 6: Staining or Painting the Frame (Optional):
If desired, apply a wood stain or paint to the frame. Follow the manufacturer's instructions for application and drying times. Multiple coats may be required for optimal coverage and color saturation. Allow each coat to dry completely before applying the next.
Step 7: Sealing the Frame (Optional):
Applying a polyurethane sealant provides added protection and durability to the frame, particularly if it has been stained or painted. Apply the sealant in thin, even coats, following the manufacturer's instructions. Allow each coat to dry thoroughly before applying subsequent coats.
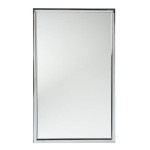
Step 8: Attaching the Mirror to the Frame:
Lay the frame face down on a clean, flat surface. Carefully center the mirror glass within the frame's opening. Apply mirror adhesive to the back of the frame, following the adhesive manufacturer's instructions for application and drying time. Gently lower the mirror onto the adhesive, ensuring it remains centered within the frame. Apply even pressure across the mirror surface to ensure proper adhesion.
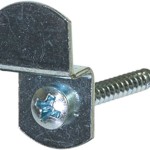
Step 9: Adding Mirror Clips (Optional):
For extra security, especially for larger mirrors, heavy-duty mirror clips can be installed along the inside edges of the frame. These clips provide additional support and prevent the mirror from shifting or falling out. Ensure the clips are appropriate for the mirror's thickness and weight.
Step 10: Drying and Curing:
Allow the mirror adhesive and any sealant to dry and cure completely according to the manufacturers' instructions before moving or handling the finished mirror. This ensures a strong and secure bond between the mirror and the frame.

Diy Floor Mirror Liz Marie Blog

Diy Floor Mirror Liz Marie Blog

I Saved Hundreds Easy Diy Modern Framed Floor Mirror

Diy Floor Mirror Liz Marie Blog

How To Make Your Own Mirror A Rustic Diy Project Ideas For The Home

Floor Mirrors Country Design Style

How To Make A Large Floor Mirror Frame Diy Wood

How To Make Your Own Mirror A Rustic Diy Project Ideas For The Home

Diy Expanding Foam Mirror Make A Statement Monsterscircus

Diy Floor Mirror Liz Marie Blog