How To Make Your Own Makeup Mirror With Lights
Creating a customized makeup mirror with integrated lighting offers a functional and stylish addition to any vanity. This guide provides a comprehensive walkthrough of the process, enabling individuals to construct a professional-quality mirror at home.
Gathering the Necessary Materials
Before commencing the project, assembling the required materials ensures a smooth and efficient workflow. The following items are essential:
- A frameless mirror of the desired size and shape.
- LED strip lights (choose warm white or daylight for optimal makeup application).
- A power supply for the LED lights (ensure compatibility with the chosen LED strip).
- Wiring, including a switch and plug.
- Mounting hardware, such as screws and anchors.
- Dimmer switch (optional, for adjustable brightness).
- Soldering iron and solder (if necessary for connecting wires).
- Measuring tape and pencil.
- Safety glasses.
Preparing the Mirror and Frame
The mirror's edges require careful preparation to ensure seamless light integration. If the mirror has a frame, it can be removed if desired for a cleaner aesthetic. Consider these steps:
- Clean the mirror's surface thoroughly to remove any dust or debris.
- If using a frame, determine the best placement for the LED strips and drill small holes for the wiring.
- If foregoing a frame, consider creating a backing board for the mirror using plywood or MDF. This provides a mounting surface for the lights and wiring.
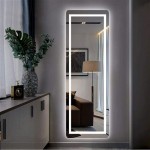
Attaching the LED Strip Lights
Proper placement and secure attachment of the LED strips are crucial for achieving even illumination. The following steps guide the process:
- Measure the perimeter of the mirror to determine the required length of the LED strip.
- Cut the LED strip to the appropriate length, ensuring the cut is made at a designated cutting point.
- Peel off the adhesive backing from the LED strip and carefully adhere it to the mirror's edge or the backing board, ensuring it is evenly spaced.
- If using a frame, route the wiring through the pre-drilled holes.
Wiring the Lights and Power Supply
Connecting the wiring and power supply involves precise execution to ensure safety and proper functionality:
- Connect the wires from the LED strip to the dimmer switch (if using) and then to the power supply, following the wiring diagram provided with the LED strip.
- If a dimmer switch is not used, connect the LED strip wires directly to the power supply.
- Connect the power supply to the wall plug via the wiring and switch.
- Ensure all connections are secure and insulated using electrical tape or heat shrink tubing.
- Test the lights to ensure they are functioning correctly before proceeding.
Mounting the Mirror
Securely mounting the mirror ensures stability and safety. Consider the following:
- Determine the desired location for the mirror and mark the wall for drilling.
- Use appropriate mounting hardware, such as screws and anchors, to securely attach the mirror to the wall, ensuring it is level.
- If using a backing board, mount the board to the wall first and then attach the mirror to the board.
- Conceal any exposed wiring using wire clips or channels.
Adding Finishing Touches
Optional finishing touches can enhance the aesthetic appeal and functionality of the mirror:
- Consider adding a frame around the mirror for a more polished look.
- Apply a diffuser to the LED strips to soften the light and reduce glare.
- Install a touch sensor switch for convenient on/off control.
Safety Precautions
Prioritizing safety throughout the project is paramount. Adhere to the following guidelines:
- Always disconnect the power supply before working with any wiring.
- Wear safety glasses when drilling or soldering.
- Consult local electrical codes and regulations for compliance.
- Ensure proper ventilation when soldering.
- If unsure about any electrical work, consult a qualified electrician.
Maintenance and Troubleshooting
Regular maintenance ensures the longevity and functionality of the makeup mirror with lights. The following points offer general guidance:
- Clean the mirror surface and frame regularly to remove dust and debris.
- Check the wiring and connections periodically for any damage or looseness.
- Replace any burnt-out LED bulbs promptly.
- If experiencing flickering lights, check the connections and the power supply.

Diy Light Up Vanity Mirrors You Can Make Ohmeohmy Blog

Diy Make Up Mirror Vanity Makeup

Diy Vanity Mirror With Lights Under 150
:max_bytes(150000):strip_icc()/makesandmunchies-c136f898cca640faa72b6209012230cb.jpg?strip=all "7 Diy Lighted Mirror Ideas To Add A Little Extra Shine Your Space")
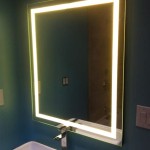
7 Diy Lighted Mirror Ideas To Add A Little Extra Shine Your Space

Vanity Makeup Mirror With Lights Dream House Diy Decoración De Unas Mesa Maquillaje

Diy Vanity Mirror With Lights Under 150

How To Create Your Own Makeup Station Luvo

How To Diy Your Dream Vanity Mirror With Lights
:max_bytes(150000):strip_icc()/thesorrygirls2-ae3caf45a59a45488d601802c41b18e5.jpg?strip=all "7 Diy Lighted Mirror Ideas To Add A Little Extra Shine Your Space")
7 Diy Lighted Mirror Ideas To Add A Little Extra Shine Your Space

Diy Light Up Vanity Mirrors You Can Make Ohmeohmy Blog