How to Mount a Mirror on a Tile Wall
Mounting a mirror on a tile wall presents a unique set of challenges compared to drywall or wood. The hard, brittle nature of tile demands careful techniques to avoid cracking, chipping, or otherwise damaging the surface. Selecting the appropriate tools and employing precise methods are crucial for a successful and aesthetically pleasing installation.
This article provides a comprehensive guide on how to mount a mirror securely and safely on a tile wall, covering essential preparations, drilling techniques, and various mounting options. By following these instructions, individuals can confidently install mirrors without compromising the integrity of the tile surface.
Key Point 1: Preparing for the Installation
Proper preparation is paramount to prevent damage to the tile and ensure a secure mirror installation. This stage involves gathering the necessary tools, assessing the tile surface, and accurately marking the desired mirror location.
Gathering the Necessary Tools and Materials: The following tools and materials are essential for mounting a mirror on a tile wall:
- Mirror: The mirror to be installed, complete with any provided mounting hardware.
- Measuring Tape: For accurate measurements of the wall and mirror.
- Level: To ensure the mirror is hung straight. A laser level can be particularly helpful.
- Pencil: For marking drilling locations. Use a pencil that is easily erasable on tile.
- Painter's Tape: To provide a protective layer and prevent chipping around the drilling area.
- Drill: A variable-speed drill is recommended for controlled drilling.
- Tile Drill Bits: Specialized drill bits designed for drilling through tile without cracking it. Diamond-tipped or carbide-tipped drill bits are highly recommended. Ensure the drill bit size corresponds to the anchors to be used.
- Wall Anchors: Anchors appropriate for tile walls and the weight of the mirror. Options include plastic anchors, molly bolts, or toggle bolts. Select anchors based on the wall's construction (e.g., concrete, drywall, plaster).
- Screws: Screws that are compatible with the selected anchors. The length of the screw should be sufficient to pass through the mirror mounting hardware, the tile, and the anchor.
- Safety Glasses: To protect eyes from debris during drilling.
- Dust Mask: To avoid inhaling tile dust.
- Hammer: For gently tapping anchors into place, if necessary.
- Screwdriver: To tighten screws. Use the correct type of screwdriver (Phillips or flathead) for the screws being used.
- Wet Sponge or Cloth: To cool the drill bit and clean the tile surface.
Assessing the Tile Surface: Before starting any drilling, carefully examine the tile surface for any existing cracks, chips, or loose tiles. Avoid drilling near any pre-existing imperfections, as this increases the risk of further damage. It is also crucial to identify the type of tile (e.g., ceramic, porcelain, glass) as this will influence the drilling technique. Porcelain tiles are generally harder and require more specialized drill bits and slower drilling speeds than ceramic tiles.
Marking the Mirror Location: Accurately determine the desired location for the mirror and mark the position of the mounting holes. Use a level to ensure the mirror will be hung straight. Consider using a laser level for increased precision. Using painter's tape, create an "X" shape over each marked drilling location. The tape provides a clearer surface for marking and helps prevent the drill bit from slipping, reducing the risk of scratching the tile surface. Transfer the measurements from the mirror's mounting hardware to the wall with utmost accuracy. Measure twice, drill once.
Key Point 2: Drilling Through Tile
Drilling through tile requires patience and precision. Employing the correct technique is essential to minimize the risk of cracking or chipping the tile. This section outlines the recommended drilling procedure for tile walls.
Choosing the Correct Drill Bit: Selecting the right drill bit is crucial for successfully drilling through tile. Diamond-tipped drill bits are generally considered the best option for hard tiles like porcelain and glass. Carbide-tipped drill bits are suitable for softer tiles like ceramic. Ensure the drill bit is the correct size for the anchors being used. Using a bit that is too small will prevent the anchor from fitting, while using a bit that is too large will result in a loose and unstable installation.
Drilling Technique:
- Start Slow: Begin drilling at a very slow speed. Applying too much pressure or drilling too quickly can cause the tile to crack. Maintain a steady, even pressure.
- Cool the Drill Bit: Tile drilling generates a significant amount of heat, which can damage the drill bit and the tile. Periodically dip the drill bit in water or apply a wet sponge to the drilling area to keep it cool.
- Pilot Hole (Optional): For very hard tiles, consider drilling a small pilot hole with a smaller drill bit before using the final-sized drill bit. This helps to guide the larger bit and reduce the risk of slipping.
- Gradually Increase Speed: Once the drill bit has penetrated the surface of the tile, gradually increase the drilling speed while maintaining constant pressure. Avoid applying excessive force.
- Drill Through the Tile Only: Once the drill bit has penetrated the tile, reduce the pressure and continue drilling carefully through the rest of the tile. Avoid pressing too hard once you hit the wall behind the tile, as this can crack the tile.
- Switch Drill Bits (If Necessary): If the wall behind the tile is made of a different material (e.g., concrete, drywall), you may need to switch to a different type of drill bit once you have drilled through the tile. For concrete, use a masonry drill bit. For drywall, the tile drill bit can usually work.
Troubleshooting Common Issues:
- Drill Bit Slipping: If the drill bit is slipping on the tile surface, try creating a small indentation with a nail and hammer to provide a starting point. Alternatively, consider using a specialized tile drilling guide.
- Tile Cracking: If the tile begins to crack, stop drilling immediately. Assess the damage and determine the cause. Possible causes include excessive pressure, using the wrong drill bit, or drilling too quickly. Start again with a new tile if possible, or reposition the mirror.
- Drill Bit Overheating: If the drill bit overheats, stop drilling and allow it to cool down completely before continuing. Ensure you are providing adequate lubrication and cooling.
Key Point 3: Mounting the Mirror
After drilling the holes, the final step is to install the anchors and mount the mirror securely. This section details the procedure for installing various types of anchors and mounting the mirror.
Installing Wall Anchors: The type of wall anchor to use will depend on the weight of the mirror and the type of wall behind the tile. Common options include:
- Plastic Anchors: Suitable for lightweight mirrors and drywall walls. Insert the anchor into the drilled hole and gently tap it into place with a hammer, if necessary.
- Molly Bolts: Provide a stronger hold than plastic anchors and are suitable for medium-weight mirrors and drywall or plaster walls. Insert the molly bolt into the drilled hole and tighten the screw until the anchor expands and grips the wall.
- Toggle Bolts: Offer the most secure hold and are ideal for heavy mirrors and hollow walls (e.g., drywall, plaster). Fold the toggle wings and insert them through the drilled hole. Once the wings are inside the wall, they will spring open. Tighten the screw to secure the anchor.
Follow the manufacturer's instructions for installing the specific type of anchor being used. Ensure the anchor is properly seated in the wall and that the screw is tightened securely, but avoid overtightening, as this can strip the threads or damage the anchor.
Mounting the Mirror: Once the anchors are installed, carefully align the mirror's mounting hardware with the anchors and insert the screws. Tighten the screws until the mirror is securely mounted to the wall. Use a level to ensure the mirror is hanging straight. If necessary, adjust the screws to achieve perfect alignment.
Alternative Mounting Methods: In situations where drilling through tile is not desirable or feasible, alternative mounting methods can be considered:
- Mirror Mastic: A strong adhesive specifically designed for mounting mirrors. Apply the mastic to the back of the mirror and press it firmly against the tile wall. Use painter's tape to hold the mirror in place until the mastic cures completely. This method is suitable for lightweight mirrors and smooth, clean tile surfaces. Ensure the mastic is compatible with both the mirror backing and the tile surface.
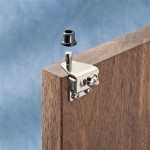
- Mirror Clips: Metal or plastic clips that are attached to the wall with screws or adhesive. The clips hold the mirror in place and provide a clean, minimalist look. Ensure the clips are properly spaced and securely attached to the wall. This method might still require drilling.
- Heavy-Duty Mounting Tape: Double-sided tape designed for heavy-duty applications. Apply the tape to the back of the mirror and press it firmly against the tile wall. This method is suitable for lightweight mirrors and smooth, clean tile surfaces. The tile surface must be properly cleaned and prepared for the tape to adhere effectively.
These alternative mounting methods may not provide the same level of security as drilling and using anchors, especially for heavier mirrors. Carefully consider the weight of the mirror and the condition of the tile surface before choosing an alternative mounting method.

How To Hang Mirrors On Tile 3 Ways A Bonus The Palette Muse

A New Bathroom Accent Wall How To Hang Mirror On Tile Lindi Russ

How To Hang Mirrors On Tile 3 Ways A Bonus The Palette Muse

Tutorial How To Hang A Bathroom Mirror The Diy Playbook

Please Help Hanging Mirror On Glass Tile Ceramic Advice Forums John Bridge

Modern Bathroom Features Half Tiled Marble Walls Lined With A Wall Mount Sink Round Mirror Gold Gorgeous Designs

How To Remove A Mirror Glued The Wall Forbes Home

Mirror Walls And Tiles Mirrorworld

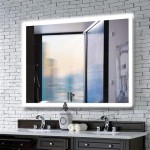
Installation And After Care Guide Led Vanity Mirrors Ledmyplace

Artforma Irregular Wall Hanging Mirror L216