How to Put Lights Around a Mirror
Adding lights around a mirror is a popular way to enhance a room's ambiance and create an inviting atmosphere. Whether you're illuminating a vanity for makeup application, highlighting a statement mirror in a living room, or adding a touch of elegance to a bathroom, carefully placed lights can dramatically transform the space. This guide will walk you through the process of successfully installing lights around a mirror, from planning to execution.
1. Design and Planning
Before you begin, it's essential to plan the design and consider several factors that will influence the final outcome.
a. Determine the lighting style
The style of lighting you choose will depend on the overall aesthetic of the room and your personal preference. Consider the following options:
- Vanity lights: These are typically mounted on the wall above the mirror, providing focused, bright light for tasks like makeup application or shaving.
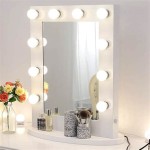
- Hollywood-style bulbs: Inspired by classic movie sets, these lights are positioned around the perimeter of the mirror, creating a dramatic and glamorous effect.
- Rope lights: Flexible and discreet, rope lights can be easily shaped to create a variety of designs around the mirror.
- LED strip lights: Offering versatility and energy efficiency, LED strip lights can be customized with various colors and brightness levels.
b. Choose the right light source
The type of light source will affect the overall ambiance and functionality of the lighting.
- Incandescent bulbs: These produce a warm, yellowish light but are less energy-efficient.
- Halogen bulbs: Offering a brighter and whiter light than incandescent bulbs, halogen bulbs are also less energy-efficient.
- LED bulbs: Highly energy-efficient, LEDs produce a cool, white light and have a longer lifespan.
- Fluorescent bulbs: These bulbs offer good energy efficiency and a bright, white light. However, they can be less appealing due to their potential flickering and buzzing.
c. Consider the size and shape of the mirror
The size and shape of your mirror will dictate the placement and number of lights you need. For smaller mirrors, fewer lights may be sufficient. Larger mirrors will require a more extensive lighting setup.
d. Determine the desired brightness
The brightness of your lights will depend on the purpose of the mirror and the surrounding lighting. For vanity mirrors, brighter lights are generally preferred, while mood lighting around a decorative mirror may require softer illumination.
2. Installation
Once you've finalized the design, gather the necessary tools and materials.
a. Gather supplies
The following items may be needed for your installation:
- Lights (bulbs, fixtures, or strip lights)
- Electrical wire
- Wire connectors
- Switches or dimmers
- Screwdrivers
- Drill and drill bits
- Measuring tape
- Level
- Safety glasses
- Electrical tape
- Optional: Mounting brackets, adhesive strips, or other mounting solutions
b. Mount fixtures
If you are using vanity lights or other fixed fixtures, carefully mount them to the wall using the provided instructions. Ensure that the fixtures are positioned evenly and level around the mirror.
c. Install wiring
If you are installing lights that require wiring, follow these steps:
- Turn off the power to the circuit that will be used for the lights.
- Run the electrical wire from the power source to the designated points around the mirror.
- Connect the wire to the light fixtures or strip lights using wire connectors.
- Cap off any unused wires.
d. Connect switches or dimmers
If desired, include switches or dimmers to control the lights. Follow the manufacturer's instructions for wiring and installation.
e. Test the lights
Once the installation is complete, turn on the power and test the lights. Ensure that all lights are functioning properly and that the brightness is to your liking.
3. Finishing touches
After successfully installing the lights, consider these final details:
a. Clean and tidy up
Remove any debris or dust from the installation area. Clean the mirror and any surrounding surfaces to ensure a polished look.
b. Add decorative elements
If desired, you can enhance the lighting setup with additional decorative elements, such as sconces, lampshades, or decorative bulbs.
c. Adjust the lighting for optimal results
Once the lights are installed, adjust the lighting to achieve the desired ambiance and brightness. You may need to experiment with the bulb type, wattage, and placement to achieve the perfect illumination.

How To Diy Vanity Mirror With Led Strip Lights

How To Diy Vanity Mirror With Led Strip Lights

Hang Lights Up On Your Mirror In Room Hanging Bedroom Outside

How Do You Put Led Lights On A Round Mirror Ehomemart

How To Diy Vanity Mirror With Led Strip Lights

How To Diy Vanity Mirror With Led Strip Lights

How To Install A Strip Light On Mirror

How To Put Fairy Lights On Wall Hang Guide

How To Design And Install Led Strip Lighting Behind A Mirror Step By Guide

How To Add Light Poorly Lit Bathroom Vanity Mirror Ers