How to Remove a Bathroom Mirror Secured with Clips
Removing a bathroom mirror held in place with clips requires careful execution to prevent damage to the mirror, wall, and surrounding surfaces. This process involves identifying the clip type, utilizing the correct tools, and employing appropriate safety measures.
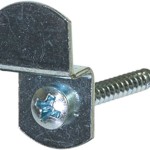
Identifying the Mirror Clips
Different types of mirror clips exist, each requiring a slightly different removal approach. Common types include J-clips, L-clips, spring clips, and decorative clips. J-clips and L-clips typically hook over the mirror's edge and are secured to the wall. Spring clips use tension to hold the mirror against the wall. Decorative clips might have a more intricate design, often concealing screws or other fasteners.
Gathering Necessary Tools and Materials
Having the right tools on hand simplifies the removal process and minimizes the risk of accidents. Essential tools include:
- Putty knife or thin pry bar
- Screwdriver (Phillips or flathead, depending on clip type)
- Safety glasses
- Work gloves
- Drop cloths or old blankets
- Masking tape
- Helper (for larger mirrors)
Preparing the Work Area
Before starting the removal, proper preparation is essential:
- Cover the sink, countertop, and floor with drop cloths or old blankets to protect them from scratches and broken glass.
- Apply masking tape along the edges of the mirror where it meets the wall to prevent accidental chipping.
- If the mirror is large or heavy, enlist a helper to assist with the removal and support the mirror once detached.
Removing J-Clips and L-Clips
J-clips and L-clips are typically the easiest to remove. The process involves carefully prying the clips away from the mirror's edge:
- Insert the putty knife or pry bar between the clip and the mirror edge.
- Gently pry the clip outwards, releasing its grip on the mirror.
- Work your way around the mirror, removing each clip one by one.
- If a clip is resistant, try using a screwdriver to loosen any screws holding it in place.
Removing Spring Clips
Spring clips require a different technique due to their tension-based mechanism:
- Locate the small tabs or notches on the spring clip that hold it in place.
- Using a small screwdriver or putty knife, carefully depress the tab or notch to release the tension.
- Once the tension is released, the clip should pull away from the mirror.
- Repeat this process for each spring clip around the mirror.
Removing Decorative Clips
Decorative clips are often more complex and may require closer examination to determine their attachment method:
- Look for hidden screws or other fasteners beneath decorative covers.
- If screws are present, use the appropriate screwdriver to remove them.
- If no screws are visible, carefully pry around the clip with a putty knife to determine how it is attached.
- Consult the manufacturer's instructions if available for specific removal guidance.
Detaching the Mirror from the Wall
Once all the clips are removed, the mirror should be free from the wall. However, adhesive or remaining sealant might still be holding it in place:
- If the mirror feels stuck, carefully insert a putty knife behind the mirror and gently pry it away from the wall.
- Work slowly and evenly around the perimeter to avoid cracking the mirror.
- If a helper is available, have them support the mirror as it comes loose from the wall.
Handling and Storing the Mirror
After removing the mirror, handle it with care to prevent damage:
- Wear gloves to protect hands from sharp edges.
- Lean the mirror against a wall in a safe location, preferably on a padded surface.
- If storing the mirror, cover it with a protective blanket or cardboard to prevent scratches.
Addressing Wall Damage
Removing mirror clips may leave small holes or marks on the wall. These can be addressed using standard wall repair techniques:
- Fill small holes with spackling paste.
- Sand the repaired area smooth once the spackle dries.
- Touch up the paint to match the surrounding wall.

Removing A Bathroom Mirror Mounting Clips Or Brackets

How To Remove A Bathroom Mirror Lowe S

2 Step Guide How To Remove A Bathroom Mirror With Clips

Taking Down A Bathroom Mirror

How To Remove A Frameless Mirror Like Nervous Grandma

How To Safely And Easily Remove A Large Bathroom Builder Mirror From The Wall Site Title

How To Safely And Easily Remove A Large Bathroom Builder Mirror From The Wall Site Title

How To Remove A Bathroom Mirror Lowe S

How To Remove Mirror Off Wallsafely

How To Remove A Frameless Mirror Like Nervous Grandma