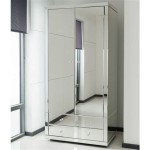
How to Stick a Mirror on a Wardrobe Door
Adding a mirror to a wardrobe door can enhance a room's sense of space and provide a convenient dressing area. However, attaching a large, heavy object like a mirror requires careful planning and execution to ensure safety and longevity. This article outlines the necessary steps to successfully adhere a mirror to a wardrobe door.
Assessing the Wardrobe Door
Before beginning, it's crucial to assess the wardrobe door's suitability for supporting a mirror. Several factors influence this compatibility:
- Material: Solid wood doors generally offer the best surface for adhesion. Particleboard or MDF doors may require additional reinforcement due to their less dense structure.
- Construction: The door must be sturdy enough to handle the added weight of the mirror. A hollow-core door might not be suitable without internal bracing.
- Surface: The surface should be clean, dry, and free from any peeling paint or varnish. Existing finishes may need light sanding or priming for optimal adhesion.
Choosing the Right Mirror and Adhesive
Selecting the appropriate mirror and adhesive is paramount for a successful and safe installation.
- Mirror Type: Consider the weight and thickness of the mirror. Thicker mirrors are heavier and require stronger adhesives. Safety-backed mirrors are recommended to minimize the risk of shattering if broken.
- Adhesive Options: Several adhesives are suitable for attaching mirrors to wardrobe doors. These include specialized mirror adhesives, heavy-duty construction adhesives, and mounting tapes. Always choose an adhesive specifically designed for mirrors and ensure it's compatible with the wardrobe door material.
- Adhesive Application: Follow the manufacturer's instructions carefully regarding the application method, drying time, and weight capacity. Some adhesives require full curing time before the mirror can be safely used.
Preparing the Surfaces
Proper surface preparation is essential for achieving a strong and lasting bond.
- Cleaning: Thoroughly clean both the wardrobe door surface and the back of the mirror with a suitable cleaner. Remove any dust, grease, or residue that might interfere with adhesion.
- Drying: Ensure both surfaces are completely dry before applying the adhesive. Moisture can significantly weaken the bond.
- Priming (if necessary): If the wardrobe door has a glossy finish, lightly sanding the area where the mirror will be attached followed by applying a primer can improve adhesion.
Applying the Adhesive and Positioning the Mirror
Careful application and positioning are crucial for a secure and visually appealing result.
- Adhesive Placement: Apply the adhesive to the back of the mirror as per the manufacturer's instructions. Typically, this involves applying dots or lines of adhesive evenly spaced across the surface.
- Positioning the Mirror: Carefully position the mirror on the wardrobe door. Using a level ensures the mirror is straight. Have a helper assist with positioning larger, heavier mirrors.
- Securing the Mirror: Apply firm, even pressure to the mirror surface to ensure good contact with the adhesive. Use temporary supports, such as painter's tape or wooden blocks, to hold the mirror in place while the adhesive cures.
Finishing Touches and Safety Considerations
Completing the installation with attention to safety ensures a functional and secure mirror.
- Curing Time: Allow the adhesive to cure completely according to the manufacturer's instructions before removing any temporary supports or using the wardrobe door.
- Edge Sealing (Optional): Sealing the edges of the mirror with a clear silicone sealant can prevent moisture from getting behind the mirror and damaging the adhesive or the door.
- Regular Inspection: Periodically inspect the mirror and adhesive for any signs of loosening or damage. Address any issues promptly to prevent the mirror from falling.
Alternative Mounting Methods
While adhesive is a popular method, other options exist for mounting mirrors on wardrobe doors.
- Mirror Clips: These metal clips are screwed into the wardrobe door and hold the mirror in place. This method offers a more permanent solution but requires drilling holes in the door.
- J-Channels: J-shaped metal channels are another option. One channel is attached to the door, and the other to the back of the mirror. The mirror then slides into the channels, providing a secure and concealed mounting system.
Choosing the Right Mounting Method
The best mounting method depends on several factors, including the size and weight of the mirror, the type of wardrobe door, and the desired aesthetic.
- Weight Considerations: For heavier mirrors, mirror clips or J-channels offer a more secure mounting than adhesive.
- Reversibility: Adhesive provides a less permanent solution than clips or channels. If you anticipate needing to remove the mirror in the future, adhesive or mounting tape might be preferable.
- Aesthetics: Clips and J-channels can be visible, while adhesive provides a cleaner, more seamless look.

How To Install A Mirror On Wardrobe Door

How To Cover Closet Door Mirrors Easily

Sliding Mirror Closet Doors All You Need To Know

26 Inexpensive Diy Upgrades That Will Add A Touch Of Class To Your Home Decor Look

How To Make Mirrored Wardrobe Doors Cut Plastic Sheeting

3 Ways To Hang A Door Mirror Wikihow

Diy Mirrored Closet Door Makeover Remodelaholic

20 Diy Closet Mirror Door Makeover Angela Rose Home

Mirrored Closet Door Makeover

Framing Out A Mirror That S Mounted On Door Young House Love