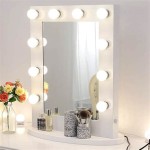
Makeup Mirror Light Bulb Replacement
Replacing a light bulb in a makeup mirror might seem like a simple task, but variations in mirror design and bulb types can present unexpected challenges. This article provides a comprehensive guide to navigating the process, ensuring proper illumination for makeup application.
Identifying the Bulb Type
Before purchasing a replacement bulb, accurate identification of the current bulb is crucial. This involves noting several key characteristics:
1. Bulb Shape: Common shapes include globe (G), tubular (T), and candle (CA). The shape designation is typically followed by a number indicating the bulb's diameter in eighths of an inch (e.g., G25 is a globe bulb with a 25/8 inch or 3.125-inch diameter).
2. Base Type: The base is the part of the bulb that connects to the socket. Common types include screw-in (E for Edison), bayonet (B), and wedge (W). Specific designations further categorize the base, such as E26 (medium Edison screw) or E12 (candelabra screw).
3. Voltage: Voltage requirements are typically printed on the bulb. Common voltages for makeup mirrors are 12V and 120V. Using an incorrect voltage can damage the mirror or the bulb.
4. Wattage: Wattage determines the bulb's brightness. Choosing a wattage similar to the original bulb is recommended. Too high a wattage can generate excessive heat.
5. Color Temperature: Measured in Kelvin (K), color temperature impacts the light's appearance. Lower values (2700K-3000K) produce warm, yellowish light, while higher values (5000K-6500K) produce cool, bluish-white light. Neutral white light (around 4000K) is generally preferred for makeup application.
Locating Replacement Bulbs
Once the bulb type is identified, replacement bulbs can be sourced from various retailers:
1. Hardware Stores: Large hardware stores often carry a wide selection of light bulbs, including specialized types used in makeup mirrors.
2. Lighting Stores: Specialty lighting stores offer an even broader range of bulbs, including hard-to-find types and finishes.
3. Online Retailers: Online marketplaces provide access to a vast inventory of bulbs, often at competitive prices. Ensure the retailer is reputable and provides accurate product descriptions.
4. Manufacturer's Website: For specific or proprietary bulb types, checking the mirror manufacturer's website can be beneficial. They may offer direct sales or guidance on sourcing the correct replacement.
Replacing the Bulb
The bulb replacement process varies depending on the mirror design. However, certain general steps often apply:
1. Disconnect Power: Unplug the mirror from the electrical outlet to prevent electric shock.
2. Access the Bulb: Depending on the mirror, the bulb may be accessed by unscrewing a cover, removing a diffuser, or sliding a panel. Refer to the mirror's instruction manual for specifics.
3. Remove the Old Bulb: If the bulb has a screw-in base, turn it counterclockwise to remove it. For bayonet bases, push gently and turn. For other base types, consult the mirror's manual.
4. Install the New Bulb: Insert the new bulb into the socket and secure it by turning clockwise (for screw-in bases) or pushing and turning (for bayonet bases).
5. Reassemble the Mirror: Reattach any covers, diffusers, or panels removed during the process.
6. Restore Power: Plug the mirror back into the electrical outlet.
Troubleshooting Common Issues
Occasionally, problems may arise during the replacement process:
1. Bulb Won't Fit: Double-check the bulb specifications against the original bulb. Even slight variations in size or base type can prevent proper installation.
2. Bulb Doesn't Light: Ensure the mirror is plugged in correctly and the power outlet is functioning. If the bulb still doesn't light, try a different bulb to rule out a faulty replacement.
3. Mirror Flickers: Flickering can indicate a loose connection. Check the bulb base and the wiring within the mirror. If the problem persists, consult a qualified electrician.
Maintaining Makeup Mirror Lighting
Proper maintenance can extend the life of makeup mirror bulbs and ensure optimal illumination:
1. Regular Cleaning: Dust and debris can accumulate on the bulbs and diffusers, reducing light output. Regularly clean these components with a soft cloth and appropriate cleaning solution, ensuring the mirror is unplugged during cleaning.
2. Avoid Touching Bulbs: Skin oils can shorten the lifespan of halogen bulbs. Handle replacement bulbs by the base or wear gloves during installation.
3. Proper Ventilation: Adequate ventilation around the mirror can prevent overheating, which can damage bulbs and other components. Avoid placing objects directly in front of or on top of the mirror.

Vanity Mirror Light Bulb Replacement How To Replace On A Sunter Lighted

Replacement Light Bulbs For J1010 Mirror Go Lightly Makeup Jerdon Style

2 Pieces Double Side Illuminated Magnification Mirror Lighted Replacement Bulb For Cosmetic Vanity Makeup Suitable 6k White Dimmable Ca

Hollywood Mirror Bulbs Replacement Spares Dimmable Led E27 Mirrors

Conair Double Sided Illuminated Mirror 20w Replacement Bulbs

Usa Mirror Warranty Replacement Sunter Vanity Bulbs

Byootique Purple G80 Led Globe Bulb E27 Replacement For Vanity Mirror Set Of 6 Com

Conair Lighted Incandescent Mirror 20w Replacement Bulb

Dinglilighting Hollywood Makeup Mirror Vanity With Lights Large Bedroom Led Bulbs Dimmable 3 Color Lighting Mode Removable Magnification Com

2 Replacement Bulbs For Clairol True To Light Makeup Mirror 6w