Rustic Wood Frame Mirror DIY
Creating a rustic wood frame mirror is a rewarding project that adds a touch of handmade charm to any home décor. This style complements various interior design themes, from farmhouse to modern rustic. The following steps outline how to craft a personalized mirror frame with rustic appeal.
Gathering Materials and Tools
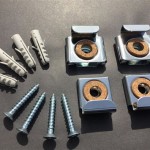
The first step involves assembling the necessary materials and tools. Required materials include a mirror (with or without an existing frame), rustic wood planks (reclaimed wood adds authentic character), wood glue, wood screws, measuring tape, and a saw (a miter saw is recommended for angled cuts). Essential tools also comprise a drill, sandpaper (various grits for smoothing and finishing), safety glasses, and work gloves. Optional materials include wood stain, sealant, and hanging hardware.
Preparing the Wood
Once the materials are gathered, preparing the wood is crucial. Begin by measuring the mirror's dimensions to determine the required length and width of the frame pieces. If using reclaimed wood, ensure it is clean and free of any loose debris or protruding nails. Cut the wood planks to the appropriate lengths, ensuring accurate measurements for a snug fit around the mirror. A 45-degree angle cut at the ends of each piece creates professional-looking mitered corners. Sanding the wood planks smooths rough edges and prepares the surface for staining or sealing.
Constructing the Frame
With the wood prepared, the frame construction can begin. Apply wood glue to the mitered edges of the frame pieces, carefully joining them together to form a rectangular frame. Secure the corners with wood screws, ensuring they are countersunk to avoid interference with the mirror placement. Clamping the frame while the glue dries ensures a strong bond and prevents shifting. Allow adequate drying time according to the wood glue manufacturer's instructions.
Finishing the Frame
After the glue has dried, the frame can be finished to enhance its rustic appearance. Sanding any remaining rough edges or excess glue creates a smooth surface. Applying wood stain adds color and depth, highlighting the wood's natural grain. Multiple coats of stain can be applied to achieve the desired color intensity. Allow each coat to dry completely before applying the next. Sealing the frame with a clear sealant protects the wood from moisture and wear, prolonging its lifespan.
Attaching the Mirror
Once the frame is finished, the mirror can be attached. Depending on the mirror's construction, it can be secured to the frame using mirror adhesive, clips, or a backing board. If using adhesive, apply it evenly to the back of the frame and carefully position the mirror. Using clips requires attaching them to the inside edges of the frame and securing the mirror within them. A backing board provides additional support and can be attached to the frame with screws, creating a recess for the mirror to rest in.
Adding Hanging Hardware
The final step involves attaching hanging hardware to the back of the frame. The type of hardware used depends on the weight of the mirror and the wall material. D-rings and wire are a common choice for lighter mirrors, while heavier mirrors may require more robust hardware, such as sawtooth hangers or French cleats. Ensure the hardware is securely attached to the frame to prevent the mirror from falling. Consider the placement of the hardware to ensure the mirror hangs level.
Displaying the Mirror
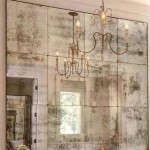
With the hanging hardware attached, the rustic wood frame mirror is ready to be displayed. Choose a location that complements the mirror's style and size. Hang the mirror securely on the wall, ensuring it is level and stable. The newly crafted mirror adds a personalized touch to the space, reflecting both the maker's skill and the rustic charm of natural wood.
Customizing the Frame
The beauty of a DIY project lies in the ability to customize it to individual preferences. Consider adding decorative elements such as carved details, metal accents, or painted designs to further personalize the frame. Experimenting with different wood types, stains, and finishes allows for creating a truly unique piece that reflects individual style and complements existing décor.

Diy Rustic Wood Frame Mirror Amanda Katherine

Diy Rustic Wood Frame Mirror Amanda Katherine

Diy Reclaimed Wood Frames The Space Between

Diy Rustic Bathroom Mirror Domestically Speaking

Stunning Diy Bedroom Projects

Diy Wood Frame Mirror Makeover With Hooks Funky Junk Interiors

34 Reclaimed Wood Diy Projects You Can Make At Home Mirror Bathroom Frames

Diy Wood Frame Mirror Farmhouse Industrial Bathroom Joyfully Treasured

Modern Diy Rustic Mirror Frame H2obungalow

Diy Wooden Farmhouse Full Length Mirror Simplylifewithallison