Sea Glass Mirror DIY
Creating a sea glass mirror is a rewarding project that combines the beauty of found objects with practical home décor. This article provides a comprehensive guide to crafting a unique and personalized sea glass mirror, covering everything from material selection to mounting techniques. The process allows for creative expression and customization, resulting in a piece that reflects individual style and a connection to the ocean.
Gathering and Preparing Sea Glass
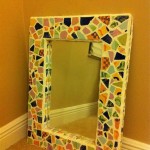
The first step in crafting a sea glass mirror involves collecting or sourcing the sea glass itself. Authentic sea glass, weathered and frosted by the ocean's currents, is often found along beaches and shorelines. Alternatively, craft stores and online marketplaces offer a variety of sea glass options, including artificially tumbled glass that mimics the appearance of genuine sea glass. When gathering sea glass, consider the desired color palette and the overall size of the mirror. A mix of sizes and shades can create a visually interesting texture. Once collected, the sea glass should be thoroughly cleaned with soap and water, removing any dirt or debris.
Sorting the sea glass by size and color can be beneficial for planning the design and ensuring a balanced distribution on the mirror frame. A shallow dish or container can be used to keep different categories organized during the crafting process. If using authentic sea glass, be mindful of its delicate nature and handle it with care to avoid chipping or breakage.
Selecting the Mirror and Frame
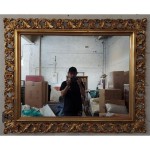
The choice of mirror and frame significantly impacts the final look of the sea glass creation. A simple, flat-framed mirror serves as an excellent base for the sea glass application. The frame material can be wood, metal, or plastic, depending on personal preference and the desired aesthetic. Consider the size and shape of the mirror in relation to the space where it will be displayed. A larger mirror with a wider frame offers more surface area for sea glass embellishment.
When choosing a frame, ensure it has a flat surface wide enough to accommodate the sea glass pieces and the adhesive. A frame with a slight lip or edge can help contain the adhesive and prevent it from seeping onto the mirror surface. Preparing the frame surface may involve light sanding or cleaning to enhance adhesion.
Adhering the Sea Glass
Proper adhesion is crucial for a durable and long-lasting sea glass mirror. Several types of adhesives are suitable for this project, including strong craft glue, epoxy, or specialized glass adhesive. The chosen adhesive should be appropriate for both the frame material and the sea glass. Before applying the adhesive, consider laying out the sea glass pieces on the frame to visualize the design and make any necessary adjustments.
Applying the adhesive in small sections prevents it from drying prematurely. Use a toothpick or small applicator to dispense controlled amounts of adhesive onto the back of each sea glass piece before placing it on the frame. Gently press each piece onto the frame, ensuring good contact. Maintain consistent spacing between the pieces, or overlap them slightly for a denser coverage, depending on the desired effect. After placing all the sea glass, allow the adhesive to dry completely according to the manufacturer's instructions.
Grouting (Optional)
Grouting the spaces between the sea glass pieces is an optional step that can add a finished and polished look to the mirror. Grout fills the gaps, enhancing the stability of the sea glass and creating a cohesive surface. Choose a grout color that complements the sea glass and the frame. Mix the grout according to the package directions and apply it carefully to the spaces between the sea glass using a grout applicator or a small spatula.
Remove excess grout with a damp cloth or sponge, being careful not to dislodge the sea glass. After the grout has dried slightly, buff the sea glass with a clean, dry cloth to remove any remaining grout residue. Allow the grout to cure completely before handling or mounting the mirror.
Mounting and Displaying the Mirror
Once the adhesive and grout (if used) are fully cured, the sea glass mirror is ready for mounting. The mounting method depends on the weight and size of the mirror. Smaller mirrors can be hung using picture hangers or adhesive hooks. Larger, heavier mirrors may require more robust mounting hardware, such as D-rings and wire. Ensure the chosen mounting method is appropriate for the wall material and the weight of the mirror.
Consider the lighting and surrounding décor when choosing a location for the mirror. Natural light can enhance the colors and textures of the sea glass, creating a captivating display. The sea glass mirror can be a focal point in a room or complement existing décor, adding a touch of coastal charm to any space.

Sea Glass Diy Projects Frame And Vase Mosaic Crafts

Home Projects Sea Glass Mirror Surround Bathrooms Remodel Beach Coastal Decor

The Mortgage Porter Diy Sea Glass Mirror

Large Round Sea Glass Mirror Isle Of Wight Beach Home Decor Singapore

The Mortgage Porter Diy Sea Glass Mirror

Diy Sea Glass Mirror

Sea Glass Mirror Diy Frame Cottage Images

Easy Diy Sea Glass Mirror Beach Themed Decor Vickymyerscreations

Custom Sea Glass Mosaic Mirror Phoenix Handcraft

Easy Diy Sea Glass Mirror Beach Themed Decor Vickymyerscreations